使用gin框架,进一步做了封装。 主要有几点:
- 规范接口定义,解析传入参数的统一处理
- 使用注释+代码自动生成
- 错误码及i18n文件
- 相关i18n文件
- openapi文档
- client端SDK
- 使用标准的rule约束,方便AI快速开发
- 先安装toolx工具
go install github.com/shrewx/ginx/pkg/toolx@latest- 初始化项目:
toolx init myproject- 按照最终的输出提示,启动项目
cd myproject/cmd/myproject && go build && ./myproject -f local-config.yaml所有的路由定义需要实现HandleOperator这个接口,里面包括三个方法
- Path() string // 说明该路由的路径
- Method() string // 说明该路由的HTTP Method
- Validate(ctx *gin.Context) error // 校验参数,返回校验错误
- Output(ctx *gin.Context) (interface{}, error) // 接口的具体功能逻辑
例如:
type GetHelloWorld struct {
    ginx.MethodGet
}

type GetHelloWorldResponse struct {
    Message string `json:"message"`
}

func (g *GetHelloWorld) Path() string {
    return "/hello"
}

func (g *GetHelloWorld) Validate(ctx *gin.Context) error {
    return nil
}

func (g *GetHelloWorld) Output(ctx *gin.Context) (interface{}, error) {
    return GetHelloWorldResponse{Message: "hello world"}, nil
}这就是一个接口的完整定义,并且建议一个接口一个文件,文件名可与类名相同,如get_hello_world.go,这样开发者方便查看和修改。
其中Output(ctx *gin.Context) (interface{}, error) 有两个返回值。
第一个定义为interface,即返回任何类型的对象都可以, 框架会判断其类型来设置不同的ContextType(默认使用application/json)
第二个是error,为了规范错误码的定义,使用statuserror库和自动化工具进行生成,错误码返回结构定义为:
{
  "key": "DDIResourceNotFound",
  "code": "404000000001",
  "message": "视图未找到",
}如果返回的error没有实现CommonError这个接口,错误就会封装成status_error.CommonError
status_error.CommonError{
    Key:     "InternalServerError",
    Code:    http.StatusBadGateway,
    Message: e.Error(),
}
和gin对比
ir.GET("/hello", func (context *gin.Context) {
    context.JSON(http.StatusOK, struct {
        Message string `json:"message"`
        }{
	 Message: "hello world"
	})
    }
)路由组定义一组路由的相同的路径前缀,和gin的Group是一个概念。
例如:
var (
	V0Router = ginx.NewRouter(ginx.Group("v0"))
)

func init() {
	V0Router.Register(&GetHelloWorld{})
}那么GetHelloWorld这个接口的完整路径就是/v0/hello
和gin对比
group := ir.Group("v0")
group.GET("/hello", func (context *gin.Context) {
context.JSON(http.StatusOK, struct {
Message string `json:"message"`
    }{
	Message: "hello world"
    })
  }
)中间件需要实现的接口是TypeOperator,里面包括两个方法:
- Output(ctx *gin.Context) (interface{}, error)
- Type() string
若需要实现一个认证功能,所有接口都必须进行用户密码认证后才能访问则代码实现如下:
type BaseAuth struct {
	ginx.MiddlewareType
}

func (g *BaseAuth) Output(ctx *gin.Context) (interface{}, error) {
	return gin.BasicAuth(map[string]string{
		"admin": "admin",
	}), nil
}

var V0Router = ginx.NewRouter(ginx.Group("v0"), &BaseAuth{})
和gin对比
group := ir.Group("v0",gin.BasicAuth(map[string]string{
    "admin": "admin",
}))如果希望实现before和after,则实现MiddlewareOperator接口,里面包括四个方法:
- Output(ctx *gin.Context) (interface{}, error)
- Type() string
- Before(ctx *gin.Context) error
- After(ctx *gin.Context) error 举个例子:
type LoggingMiddleware struct {
	ginx.EmptyMiddlewareOperator
}

func (g *LoggingMiddleware) Before(ctx *gin.Context) error {
	logfile.Info("request: ", ctx.Request.URL.Path)
	return nil
}

func (g *LoggingMiddleware) After(ctx *gin.Context) error {
	logfile.Info("response: ", ctx.Writer.Status())
	return nil
}请求参数类型通过tag进行区分,使用关键字in声明参数类型,name声明参数名称,框架会自动解析请求的参数,并填充到结构体对应的成员变量中方便实用
同时使用了validator库,对参数进行校验, 使用关键字validate声明校验规则
参数类型如下:
type GetUserInfo struct {
	ginx.MethodGet
	Username string `in:"query" validate:"required"`
	ID       int    `in:"path" validate:"min=10"`
}

func (g *GetUserInfo) Path() string {
	return "/:id"
}

func (g *GetUserInfo) Output(ctx *gin.Context) (interface{}, error) {
	logfile.Info("id: ", g.ID, " username: ", g.Username)
	return nil, nil
}type BaseAuth struct {
ginx.HTTPBasicAuthSecurityType
Name string `in:"header" name:"Authorization"`
}
func (g *BaseAuth) Output(ctx *gin.Context) (interface{}, error) {
if g.Name != authorization("admin", "admin") {
return nil, errors.Unauthorized
}
return nil, nil
}type PutUserInfo struct {
ginx.MethodPost
// 名称
Name string `in:"form" name:"name"`
// 年龄
Age int `in:"form" name:"age"`
// 地址
Address string `in:"form" name:"address"`
}type UploadFile struct {
ginx.MethodPost
File *multipart.FileHeader `in:"multipart" name:"file1"`
}
func (u *UploadFile) Output(ctx *gin.Context) (interface{}, error) {
if u.File == nil {
return nil, errors.UploadFileIsNotExist
}
if err := ctx.SaveUploadedFile(u.File, u.File.Filename); err != nil {
return nil, err
}
return nil, nil
}type ModifyUserInfo struct {
ginx.MethodPut
Name string `in:"urlencoded" name:"name"`
}body类型里面tag直接使用json就可
type CreateUserInfo struct {
	ginx.MethodPost
	Body struct {
		// 名称
		Name    string `json:"name"`
		// 年龄
		Age     int    `json:"age"`
		// 地址
		Address string `json:"address"`
	} `in:"body"`
}如果以上都不满足要求,可直接使用gin的库的对应的方法获取请求参数。
如上面提到的,默认的情况下response的contentType是application/json, 如果需要其他类型的,框架封装了一些Mine结构体可使用。
func (g *DownloadFile) Output(ctx *gin.Context) (interface{}, error) {
	file := ginx.NewAttachment("text.txt", ginx.MineApplicationOctetStream)
	file.Write([]byte("hello world"))
	return file, nil
}func (g *HTML) Output(ctx *gin.Context) (interface{}, error) {
html := ginx.NewHTML()
html.Write([]byte("<body> hello world</body>"))
return html, nil
}func (g *Image) Output(ctx *gin.Context) (interface{}, error) {
png := ginx.NewImagePNG()
file, err := os.ReadFile("./router/file/go.png")
if err != nil {
return nil, err
}
png.Write(file)
return png, nil
}如果框架中列出的Mine都不满足,可以自行实现MineDescriber接口或者直接使用gin的ctx.Data方法设置
func (g *OtherType) Output(ctx *gin.Context) (interface{}, error) {
	ctx.Data(http.StatusOK, "other_type", []byte("hello world"))
	return nil, nil
}可以实现Validate(ctx *gin.Context) error方法,对请求参数进行校验。如果校验失败,需要返回一个错误。
func (g *GetUserInfo) Validate(ctx *gin.Context) error {
	if g.Username == "" {
		return errors.BadRequest
	}
	return nil
}目前错误定义设计的结构如下:
//go:generate toolx gen error -p error_codes -c StatusError
//go:generate toolx gen errorYaml -p error_codes -o ../i18n -c StatusError
type StatusError int

const (
	// @errZH 请求参数错误
	// @errEN bad request
	BadRequest StatusError = http.StatusBadRequest*1e8 + iota + 1
)

const (
	// @errZH 未授权,请先授权
	// @errEN unauthorized
	Unauthorized StatusError = http.StatusUnauthorized*1e8 + iota + 1
)

const (
	// @errZH 禁止操作
	// @errEN forbidden
	Forbidden StatusError = http.StatusForbidden*1e8 + iota + 1
)

const (
	// @errZH 资源未找到
	// @errEN not found
	NotFound StatusError = http.StatusNotFound*1e8 + iota + 1
)

const (
	// @errZH 资源冲突
	// @errEN conflict
	Conflict StatusError = http.StatusConflict*1e8 + iota + 1
)

const (
	// @errZH 未知的异常信息:请联系技术服务工程师进行排查
	// @errEN internal server error
	InternalServerError StatusError = http.StatusInternalServerError*1e8 + iota + 1
)- 其中每个错误码的定义都包含了中文和英文的描述,错误描述信息对应的就是最终错误返回的I18N信息:
- errZH 表示中文描述
- errEN 表示英文描述
- 错误的定义也要符合HTTP状态码的定义,即错误码的前三位就是HTTP状态码,错误信息最好和状态码表达的含义一致,比如:
- 404表示资源未找到,则比如用户未找到错误可定义为
40400000001 - 409表示资源冲突, 则比如用户已存在错误可定义为
40900000001
- 404表示资源未找到,则比如用户未找到错误可定义为
- 执行
go:generate toolx gen error -p error_codes -c StatusError命令,就会在该错误文件目录下生成一个带__generated.go文件,该文件是自动生成的不要修改里面的内容否则下一次 程序生成后就会被覆盖,生成文件主要创建了相关方法以及I18N注册。 - 执行
go:generate toolx gen errorYaml -p error_codes -o ../i18n -c StatusError命令,会在../i18n目录下生成对应的i18yaml文件。
-
错误定义里面有相关参数:
// @errZH 用户不存在,名称:{{.Name}}
// @errEN user not found, name: {{.Name}}
UserNameNotFound StatusError = http.StatusNotFound*1e8 + iota + 1
则在使用的时候需要传入参数:
UserNameNotFound.WithParams(map[string]interface{}{
    "Name": "ryan",
})
最终的错误信息为:
用户不存在,名称:ryan -
错误信息里面,字段是动态的,且也需要I18N 首先先定义定义一个string类型的常量,使用toolx生成对应的i18n
//go:generate toolx gen i18n -p errors.references -c Field
type Field string

const (
    // @i18nZH 年龄
    // @i18nEN age
    Age Field = "age"
)
UserNameNotFound.WithParams(map[string]interface{}{
    "Name": "ryan",
}).WithField(Age, 18)
最终的错误信息为:
用户不存在,名称:ryan >> 年龄:18 -
如果需要捕获循环中的多个错误展示,则可以搭配error_list使用,比如:
func (g *Name) Output(ctx *gin.Context) (interface{}, error) {
    var errlist = statuserror.WithErrorList()
    for i, name := range g.Names {
        if err := g.checkName(name); err != nil {
            errlist.DoWithIndex(func() error {
                return statuserror.UserNameNotFound.WithParams(map[string]interface{}{
                    "Name": name,
                })
            }, int64(i)+1)
        }
    }
    return nil, errlist.Return()
}
最终的错误信息为:
索引:1
用户不存在,名称:a
索引:2
用户不存在,名称:b
索引:3
用户不存在,名称:c
//go:generate toolx gen i18n prefix errors.references CommonField
//go:generate toolx gen i18nYaml -p errors.references -o ../i18n -c CommonField
type CommonField string

const (
	// @i18nZH 行
	// @i18nEN line
	ErrorLine CommonField = "line"
	// @i18nZH 索引
	// @i18nEN index
	ErrorIndex CommonField = "err_index"
)
和错误定义类似,使用
- i18nZH 标识中文信息
- i18nEN 标识英文信息
执行go:generate toolx gen i18nYaml -p errors.references -c CommonField命令
zh:
  errors:
    references:
      err_index: 索引
      line: 行
可以看出,-p参数指定的是i18n的key前缀,使用.表示多级关系
系统使用的日志库是logrus库。 目前框架内置了几处答应日志的点
- 接受到请求后,如果需要答应请求参数,则可以将日志级别设置为debug,日志中就会包含请求参数。
time="2025-11-13 16:08:20" level=debug msg="parse GetUserInfo params : &{MethodGet:{} ID:1}"
如果需要在info级别打印请求参数,则配置文件的show_params设置为true
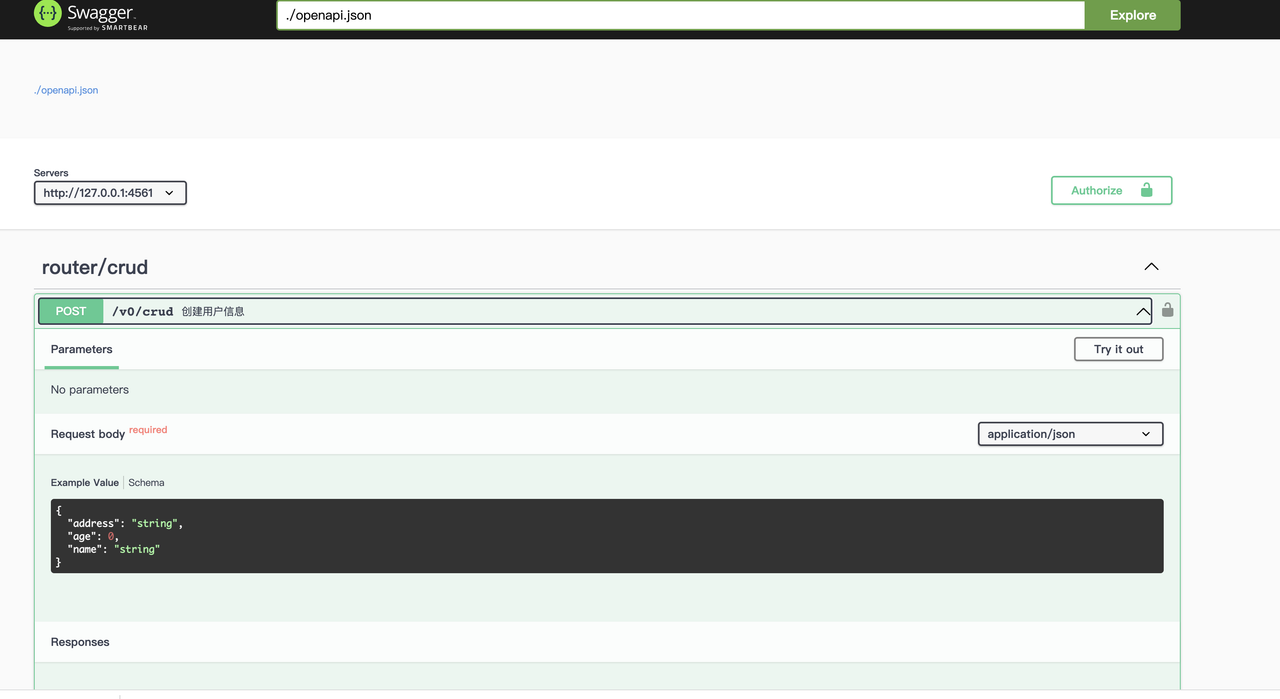
生成swagger文档go常见方式是使用go-swagger库搭配注释的形式,该库同样也是通过注释的形式来实现swagger文档的生成。 有所不同的是不需要特定的tag说明,而是使用ast库对代码进行所有注释的扫描,并且对响应结果和错误都会进行类型判断。
func init() {
	Router.Register(&CreateUserInfo{})
}

// 创建用户信息
type CreateUserInfo struct {
	ginx.MethodPost
	ID int   `in:"path"`
	Body struct {
		// 名称
		Name    string ` json:"name"`
		// 年龄
		Age     int    `json:"age"`
		// 地址
		Address string `json:"address"`
	} `in:"body"`
}

type CreateUserInfoResponse struct{

}

func (g *CreateUserInfo) Path() string {
	return "/:id"
}

func (g *CreateUserInfo) Output(ctx *gin.Context) (interface{}, error) {
	logfile.Info(g.Body.Name, g.Body.Age, g.Body.Address)
	return nil, nil
}
由于go-swagger暂时只支持到openapi2.0, 而本库使用的是openapi3.0,所以就没有直接通过引入go-swagger库来展示swagger ui,而是通过docker启动了swaggerui达到相同效果。使用到的命令是:
go install github.com/shrewx/ginx/pkg/toolx

toolx swagger -p "swagger ui 页面的端口,默认9200" -s "后台提供服务的地址,默认http://127.0.0.1:8888"
容器启动以后,就可以访问对应的页面
如果只需要生成openapi则使用命令:
toolx gen openapi -p "后台服务代码路径,默认为当前路径"为了方便其他服务调用,可自动生成client相关代码,命令为:
toolx gen client -s "客户端名称" -u "openapi.jso(支持url和本地路径)"在 Preferences --> Editor --> Live Template 添加一个Go Template
import (
	"github.com/shrewx/ginx"
	"github.com/gin-gonic/gin"
)

func init() {
	Router.Register(&$Struct${})
}

type $Struct$ struct {
	ginx.MethodGet
}

func (g *$Struct$) Path() string {
	return ""
}

func (g *$Struct$) Validate(ctx *gin.Context) error {
	$END$
	return nil
}

func (g *$Struct$) Output(ctx *gin.Context) (interface{}, error) {
	$END$
	return nil, nil
}