The Cypherpath API SDK makes it easier to write scripts and programs utilizing SDI OS's RESTful API.
These instructions have been tested to work against Ubuntu 16.04, 18.04, and Windows 10. Installing on another OS may require some extra research and trial and error. If you have any problems, and there doesn't seem to be any hints with searching for an answer, feel free to submit an issue.
Use apt to install the following packages.
git
python3
python3-pip
python3-venv
You can run the following line to install all needed packages
sudo apt-get install git python3 python3-pip python3-venvClone this repository to your local machine or unzip/extract the project.
Here's what to run to clone the project:
git clone https://github.com/cypherpath/sdios-api-sdk.gitTo keep python packages nice and clean, it is recommended to create a python virtual environment. This is really simple to do and prevents python package bloat on your system.
This step is optional and you can skip this step to install python packaged into your machine.
Create an empty directory in the root directory of the project:
cd sdios-api-sdk/
mkdir venv
Create the virtual environment:
python3 -m venv venv/Activate the virtual environment:
source venv/bin/activateYou're done! You are now in a python virtual environment. You will need to activate the virtual environment every time you open a shell. To get out of the virtual environment you'll need to run deactivate.
Run the following command to install all required python packages.
Note: If you are not in a python virtual environment explained above, you might need to run the following command as root: sudo python3-pip install -r requirements.txt
pip install -r requirements.txtIn order for any python scripts to find the project, the path to the directory will need to be added to the PYTHONPATH environment variable.
While in the root of the projects directory, run the following command.
export PYTHONPATH="$PYTHONPATH:$PWD"Setting this will be temporary as long as the shell is open. Upon opening a new shell, this will need to be re-run.
To keep your PYTHONPATH persistent, you'll need to add it to your shell's RC file or profile file. For example, if your shell is bash, you can add the following line to ~/.bashrc or ~/.bash_profile.
PYTHONPATH="$PYTHONPATH:/home/user/path-to-root-of-project/"These are the executables that are required for the project under Windows 10. Use the links provided to download.
- python3.6 - https://www.python.org/ftp/python/3.6.2/python-3.6.2-amd64.exe
- Note: After opening the installer, be sure to check the checkbox
Add Python 3.6 to PATH. Then click Install Now. Using this installer also installs pip.
- Note: After opening the installer, be sure to check the checkbox
These will need to be extracted and their location added to the system's PATH environment variable. Instructions on how to do this is here: https://msdn.microsoft.com/en-us/library/office/ee537574(v=office.14).aspx
Unzip the Cypherpath API SDK file and add this location to a PYTHONPATH environment variable. Instructions for a full python install can be followed here: https://docs.python.org/3/using/windows.html
If you have an updated version of Windows 10 which includes the Windows 10 Anniversary Update, you can now install and run an Ubuntu Bash shell. Once this is installed, the Ubuntu 16.04 install instructions above can be used to install and run the Cypherpath API SDK. Instructions on how to install the Ubuntu Bash shell on windows are here: https://www.howtogeek.com/249966/how-to-install-and-use-the-linux-bash-shell-on-windows-10/
There is a settings file at settings/general.py for the JSON output format.
JSON_FORMATTING = True  # -- Set to have any json output to be formatted on the shell's stdout.
JSON_FORMAT_INDENT = 4 # -- The number of spaces for the indent.The API SDK can be used directly from python's interactive shell, or in python scripts. I will show examples how to use the SDK both ways.
There are drivers that are grouped into 5 locations. There's the accounts drivers (GroupDriver, TenancyDriver, UserDriver), SDI drivers (MachineDriver, NetworkDriver, SDIDriver), sharing driver (SharingDriver), storage drivers (DiskDriver, GeneralDriver, SDIFileDriver) and the system drivers (SettingsDriver, StatusDriver, TaskDriver). The MachineDriver has 4 other drivers (DriveDriver, InterfaceDriver, RoutingDriver, SnapshotDriver). For example, to get all of a machine's interfaces you would use machine_driver.interface.get_interfaces(), or create a machine snapshot you would use machine_driver.snapshot.create_snapshot("<machine_id>", {"tag": "new-snapshot"}).
The prerequisite for all of the previously mentioned drivers is the APIDriver. The APIDriver is responsible for requesting an OAuth token, saving that token, and using that token for all subsequent calls. The APIDriver checks if the token is close to expiring, and if so it will request a refresh token automatically. There is also a method for revoking a token once all work is done. The following is the file tree of the drivers:
▾ api/accounts/
    *  __init__.py
    *  group.py
    *  tenancy.py
    *  user.py
▾ api/sdis/
  ▾ machine_components/
      *  __init__.py
      *  base_machine.py
      *  drive.py
      *  interface.py
      *  routing.py
      *  snapshot.py
    *  __init__.py
    *  machine.py
    *  network.py
    *  sdi.py
▾ api/sharing/
    *  __init__.py
    *  driver.py
▾ api/storage/
    *  __init__.py
    *  disk.py
    *  general.py
    *  sdi_file.py
▾ api/system/
    *  __init__.py
    *  settings.py
    *  status.py
    *  task.py
  *  __init__.py
  *  base_driver.py
* driver.pyUsing python's interactive shell makes testing, debuging, and exploration of the project very quick. Below is an example within a python shell on how to use the API SDK. You can follow along and repeat the commands to reproduce the same results.
To start the python's interactive shell, run the python3 command in either a Linux shell or Window's cmd. Running this command will drop you into the interactive shell that will look like this:
Python 3.6.5 (default, Apr 14 2018, 13:17:30)
[GCC 7.3.1 20180406] on linux
Type "help", "copyright", "credits" or "license" for more information.
>>> █
TIP: It is considered good practice to create one token, use that token for the duration of the script, refresh the token if it's soon to be expired, and revoke the token at the end of the script.
The next code snippet will accomplish the following in the interactive shell:
- Import the driver modules.
- Created the driver objects.
- Grab the user's pk number.
- Find the UUID of user's disk image.
- Create an SDI.
- Create a network in the SDI.
- Create a machine and attach the machine to a network with a disk image.
- Start the SDI.
This example assumes you are using the current API version 2.1.0. I'll be using a test admin account with the following test credentials. Do not use these credentials as they are for demonstration purposes only! Using simple account names and easy passwords is a serious security risk! Only do so temporarily in a safe segregated network on a test deployment!
>>> from api.driver import APIDriver
>>> from api.accounts import UserDriver
>>> from api.storage import DiskDriver
>>> from api.sdis import SDIDriver, MachineDriver, NetworkDriver
>>>
>>> api_driver = APIDriver(domain="192.168.1.101", credentials={"username": "admin", "password": "admin", "client_id": "adminid", "client_secret":"adminsecret"}, api_version="2.1.0")
>>> user_driver = UserDriver(api_driver)
>>> disk_driver = DiskDriver(api_driver)
>>> sdi_driver = SDIDriver(api_driver)
>>> network_driver = NetworkDriver(api_driver)
>>> machine_driver = MachineDriver(api_driver)
>>>
>>> user_pk = user_driver.get_user_pk("admin") # get admin's pk number
>>> disk_id = disk_driver.get_disk_id("blank") # get disk id of "blank"
>>>
>>> sdi_driver.user_pk = user_pk # assign the admin's user pk number
>>> response = sdi_driver.create({"name": "New SDI"})
>>> print(response)
Detail: {
"url": "https://192.168.1.101/sdi/74e9bd22-1ac1-47d6-9381-5d6b6505ff78/topology_view/",
"user": 2,
"name": "New SDI",
"description": "",
"sdi_id": "74e9bd22-1ac1-47d6-9381-5d6b6505ff78"
}
Method: POST
Status Code: 201
Reason: Created
Ok: True
URL: https://192.168.1.101/api/sdis/2/
Allow: GET, POST, HEAD, OPTIONS
>>> sdi_pk = response.detail["sdi_id"]
>>>
>>> network_driver.user_pk = user_pk
>>> network_driver.sdi_pk = sdi_pk
>>> response = network_driver.create({"name": "network1"})
>>> print(response)
Detail: {
"id": "a915dbbc-ce18-476a-8a09-45e83022cdcd",
"name": "network1",
"description": null,
"mode": "switch",
"link": {
"label": null,
"parent": null,
"type": "virtual"
},
"services": [
{}
]
}
Method: POST
Status Code: 201
Reason: Created
Ok: True
URL: https://192.168.1.101/api/sdis/74e9bd22-1ac1-47d6-9381-5d6b6505ff78/networks/
Allow: GET, POST, HEAD, OPTIONS
>>> network_id = response.detail["id"]
>>>
>>> machine_driver.user_pk = user_pk
>>> machine_driver.sdi_pk = sdi_pk
>>> response = machine_driver.create({"name": "machine1", "memory": 2048, "cores": 2,"interfaces": [network_id], "drives": [disk_id]})
>>> print(response)
Detail: {
"id": "474249df-620f-4215-aefd-f9f6ca95bd86",
"name": "machine1-00001",
"description": "",
"memory": 2048,
"sockets": 1,
"cores": 2,
"threads": 1,
"boot_priority": null,
"role": "workstation",
"image_persist": true,
"datetime": null,
"boot_device": "disk",
"boot_menu": 0,
"cpu_type": "qemu64",
"video_card": "std",
"bios_manufacturer": null,
"drives": [
{
"master_id": "e8dcd180-3b2a-4cb8-8f7f-2610e614afb9",
"master_name": "blank",
"bus": "ide"
}
],
"snapshots": [],
"vnc_data": null,
"status": null,
"interfaces": [
{
"id": "3c4c242c-e3e7-4757-9e9e-936c8f53ff12",
"network": "a915dbbc-ce18-476a-8a09-45e83022cdcd",
"nic": "e1000",
"mac": "52:54:00:35:f9:5b",
"hostname": null,
"vlan_mode": "native-untagged",
"vlan_pvid": 1,
"vlans": [
{
"vlan": 1,
"ip": "10.1.0.1",
"ipv6": "[]"
}
]
}
]
}
Method: POST
Status Code: 201
Reason: Created
Ok: True
URL: https://192.168.1.101/api/sdis/74e9bd22-1ac1-47d6-9381-5d6b6505ff78/machines/
Allow: GET, POST, HEAD, OPTIONS
>>> machine_id = response.detail["id"]
>>>
>>> print(sdi_driver.start(sdi_pk))
Detail: null
Method: POST
Status Code: 200
Reason: OK
Ok: True
URL: https://192.168.1.101/api/sdis/74e9bd22-1ac1-47d6-9381-5d6b6505ff78/start/
Allow: POST, OPTIONS
>>> print(sdi_driver.get_status(sdi_pk))
Detail: {
"state": 2,
"export_progress": null
}
Method: GET
Status Code: 200
Reason: OK
Ok: True
URL: https://192.168.1.101/api/sdis/74e9bd22-1ac1-47d6-9381-5d6b6505ff78/status/
Allow: GET, HEAD, OPTIONS
>>> sdi_driver.is_running(sdi_pk)
true
>>> print(machine_driver.get_status(machine_id))
Detail: {
"running": true,
"suspended": false,
"virtio_serial_info": {
"port": 42131
},
"hw_serial_info": {
"port": 42567
}
}
Method: GET
Status Code: 200
Reason: OK
Ok: True
URL: https://192.168.1.101/api/sdis/74e9bd22-1ac1-47d6-9381-5d6b6505ff78/machines/474249df-620f-4215-aefd-f9f6ca95bd86/status/
Allow: GET, HEAD, OPTIONS
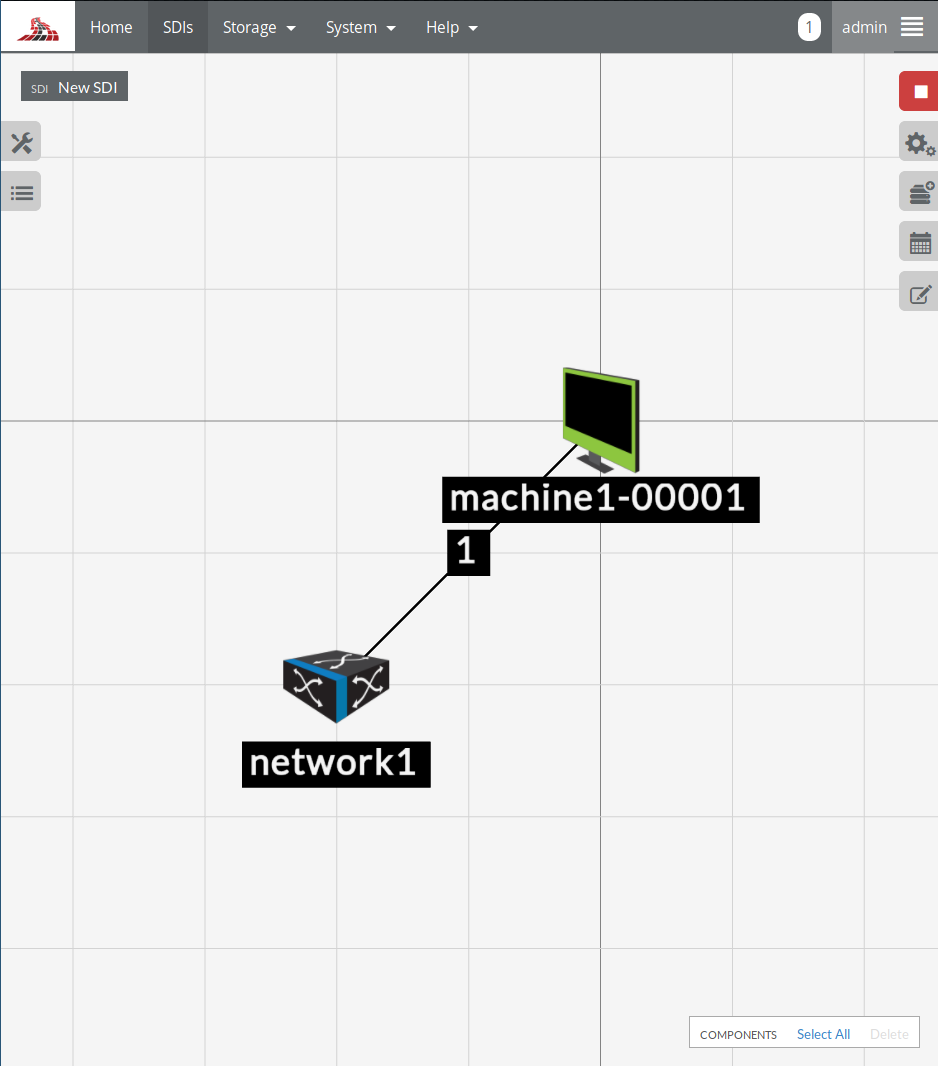
>>> █At the end, you should have an SDI that looks similar to this:
The same commands from the previous example can be used in a python script. The next example will build the same SDI but within a python script:
#!/usr/bin/env python3
from api.driver import APIDriver
from api.accounts import UserDriver
from api.storage import DiskDriver
from api.sdis import SDIDriver, MachineDriver, NetworkDriver

def main():
    domain = "192.168.1.101"
    credentials = {"username": "admin",
                   "password": "admin",
                   "client_id": "adminid",
                   "client_secret": "adminsecret"}
    api_version = "2.1.0"
    disk_name = "Windows7"

    print("Create and initialize the drivers")
    api_driver = APIDriver(domain=domain, credentials=credentials, api_version=api_version)
    user_driver = UserDriver(api_driver)
    disk_driver = DiskDriver(api_driver)
    sdi_driver = SDIDriver(api_driver)
    network_driver = NetworkDriver(api_driver)
    machine_driver = MachineDriver(api_driver)

    print("Get the user's pk and the disk's id")
    user_pk = user_driver.get_user_pk(credentials["username"])
    disk_id = disk_driver.get_disk_id(disk_name)

    print("Create an SDI")
    sdi_driver.user_pk = user_pk
    response = sdi_driver.create({"name": "New SDI"})
    print(response)
    if response.ok:
        sdi_pk = response.detail["sdi_id"]
    else:
        exit(1)

    print("\nCreate a network in that SDI")
    network_driver.user_pk = user_pk
    network_driver.sdi_pk = sdi_pk
    response = network_driver.create({"name": "network1"})
    network_id = response.detail["id"]
    print(response)

    print("\nCreate a machine and also attach the created network and blank disk")
    machine_driver.user_pk = user_pk
    machine_driver.sdi_pk = sdi_pk
    response = machine_driver.create({"name": "machine1",
                                      "memory": 2048,
                                      "cores": 2,
                                      "interfaces": [network_id],
                                      "drives": [disk_id]})
    machine_id = response.detail["id"]
    print(response)

    print("\nSDI status\n", sdi_driver.get_status(sdi_pk))
    print("\nStart the SDI")
    print(sdi_driver.start(sdi_pk))
    print("\nSDI status\n", sdi_driver.get_status(sdi_pk))

if __name__ == "__main__":
        main()