- kubectl get
nodes/pods/services/deployments/replicasets/namespaces - kubectl get all -o
wide/yaml/json - kubectl get
events - kubectl get
endpoints - kubectl get pods --namespace=
dev - Kubectl get pods -n
namespace - kubectl get pods --namespace=
dev--show-labels - kubectl config set-context --current --namespace=
namespace-name - kubectl config set-context
context-name--cluster=new-cluster-name--user=new-user-name--namespace=new-namespace - kubectl describe
pod/service/deployment/replicaset/role/rolebinding - kubectl run
name--image=image--command --cmdargs1args2 - kubectl run
name--image=image--dry-run=client -o yaml >name.yaml - kubectl run
name--image=image--args1...argsN# default commands and custom arguments - kubectl replace --force -f
name.yaml # replace - kubectl edit
pod/service/deployment/replicasetresource-name# edit - kubectl set image deployment
deployment-namename=image-name:version - kubectl delete pod
name - kubectl delete pod
name--grace-period=0--force # force delete - kubectl delete pod
name--grace-period=0--force --namespace=namespace - kubectl delete pod
name--grace-period=0--force --namespace=namespace - kubectl delete all -n
namespace--all - kubectl logs -f
pod/service/deployment/replicaset# get logs - kubectl logs -f
pod-ccontainer_name - kubectl logs --tail=20
pod-name - kubectl logs --since=1h
pod-name - Kubectl exec
pod_name-it -ccontainer_name-- /bin/bash # execute command into the pod or perticular container - kubectl create
pod/service/deployment/replicaset/namespace-fname.yaml - kubectl create -f
name.yaml - kubectl create -f
name.yaml --record # record the history - kubectl create configmap
configmap-name--from-literal=key=value--from-literal=key2=value2 - kubectl create configmap
configmap-name--from-file=path-to-file - kubectl create configmap
configmap-name--from-file=app.config.properties - kubectl create secret generic
secret-name--from-literal=key=value - kubectl create secret generic
secret-name--from-literal=key=value--from-literal=key1=value1 - kubectl create secret generic
secret-name--from-file=path-to-file - kubectl create secret generic
app-secret--from-file=app-secret.properties - kubectl apply -f
config1.yaml-fconfig2.yaml# Applies multiple configuration files. - kubectl apply -f
https://url.com/config.yaml# Applies a configuration from a URL. - kubectl scale deployment
deployment-name--replicas=5-fdeploy.yml--record # Scales a deployment to 5 replicas and records the change in the revision history. - kubectl scale replicaset
rs-name--replicas=3-freplica.yml - kubectl rollout history deployment/
deployment-name# Shows the history of deployments - kubectl rollout pause deployment/
deployment-name# Pauses the rollout of a deployment - kubectl rollout resume deployment/
deployment-name# Resumes a paused deployment rollout. - Kubectl rollout status deployment
deployment-name - kubectl expose deployment
deployment-name--port=80 --target-port=8080 # Exposes a deployment as a new service on port 80, targeting the container port 8080. - kubectl label pods
pod-nameapp=myapp - kubectl label nodes
node-namedisk=ssd - kubectl patch deployment deployment-name -p
'{"spec":{"replicas":5}}'# Updates the number of replicas for a deployment to 5. - kubectl patch service service-name -p
'{"spec":{"type":"LoadBalancer"}}'# Updates the service type to LoadBalancer. - kubectl autoscale deployment
deployment-name--min=2 --max=10 --cpu-percent=80 # Configures auto-scaling for a deployment based on CPU utilization. - kubectl autoscale replicaset
rs-name--min=3 --max=6 --cpu-percent=70 # Configures auto-scaling for a ReplicaSet based on CPU utilization. - kubectl top
nodes# Shows CPU and memory usage for nodes in the cluster. - kubectl top
pods--containers # Shows CPU and memory usage for containers in pods. - kubectl drain
node-name# Safely drains a node in preparation for maintenance. - kubectl drain
node-name--ignore-daemonsets# Drains a node while ignoring DaemonSet pods. - kubectl taint nodes
node-namekey=value:NoSchedule - kubectl taint nodes
node-namekey=value:NoSchedule- # remove taint - kubectl taint nodes
node-namekey=value:NoExecute - kubectl taint nodes
node-namekey=value:NoExecute- # remove taint - kubectl cordon
node-name# Marks a node as unschedulable, preventing new pods from being scheduled on it. - kubectl uncordon
node-name# Marks a node as schedulable, allowing new pods to be scheduled on it. - kubectl cp
file.txtpod-name:/path/to/dir# Copies a file from the local machine to a pod. - kubectl cp
pod-name:/path/to/file.logfile.log# Copies a file from a pod to the local machine. kubectl api-resources| tail +2 | awk ' { print $1 }'`; do kubectl explain $kind; done | grep -e "KIND:" -e "VERSION:"- kubectl drain
node_name# this will make the node unshedulable and make the pods spawn on other nodes - kubectl uncordon
node_name# this will make the node schedulable - kubectl cordon
node_name# this will make the node unschedulable - kubectl auth
can-icreatedeployment----> yes - kubectl auth
can-ideletenodes------> no - kubectl auth
can-icreatedeployment--asdev-user----> no - kubectl auth
can-icreatepods--asdev-user-----> yes - kubectl auth
can-icreatepods--asdev-user--namespacetest----> no - kubectl get
rolesto list all roles in the current namespace - kubectl get
rolebindings - kubectl describe role
<role_name> - kubectl describe rolebindings
rolebinding_name - kubectl create rolebinding
rolebinding_name--role=role_name--user=user_name--group=group_name - kubectl create role
role_name--verb=list,create,delete--resource=pods - kubectl create ingress
ingress-test--rule="wear.my-online-store.com/wear*=wear-service:80 - kubectl port-forward -n <servive_name> service/vote 5000:5000 --address=0.0.0.0 &

- Labels are the way by which you can filter and sort the number pods in a cluster
- selector tells the replicaset/controller/deployment which pods to watch/belongs to
- The label selector is the core grouping primitive in Kubernetes.
- Labels are usedful for filtering the environment specific pods
- You can assign multiple labels to a pod, node, cluster objects.
- By giving multiple labels you can filter out exact pods that you required.
- Labels are key=value pair without any predefined meaning
- They are similar to tags in AWS and Git
- You are free to choose labels of any name.
- You can provide label through both imperative and declarative methods.
- Define it under the metadata
- Annotations are extra details for the pod
---
apiVersion: apps/v1
kind: Deployment
metadata:
    name: myDeployment

    # This are the Deployment labels
    labels:
        app: myApp
        env: dev
spec:
   replicas: 3

   # the Selector selects the pod with specific labels
   selector:
      matchLabels:
      tier: front-end

   # template  defines the PodSpec for the new pods being created and what Labels it contains
   template:
      metadata:
      name: testpod
      labels:
          tier: front-end
      spec:
      containers:
      - name: c00
image: nginx:latest- StatefulSet is a workload API object used to manage stateful applications.
- A StatefulSet runs a group of Pods, and maintains a sticky identity for each of those Pods. This is useful for managing applications that need persistent storage or a stable, unique network identity
- Manages the deployment and scaling of a set of Pods, and provides guarantees about the ordering and uniqueness of these Pods
- StatefulSet maintains a sticky identity for each of its Pods.
- Ensures Pods are created, updated, or deleted in a specific order.
- Although individual Pods in a StatefulSet are susceptible to failure, the persistent Pod identifiers make it easier to match existing volumes to the new Pods that replace any that have failed.
- StatefulSets are valuable for applications that require one or more of the following.
- Stable, unique network identifiers.
- Stable, persistent storage.
- Ordered, graceful deployment and scaling.
- Ordered, automated rolling updates
- The storage for a given Pod must either be provisioned by a PersistentVolume Provisioner (examples here) based on the requested storage class, or pre-provisioned by an admin.
- Deleting and/or scaling a StatefulSet down will not delete the volumes associated with the StatefulSet.
- StatefulSets currently require a Headless Service to be responsible for the network identity of the Pods
- StatefulSets do not provide any guarantees on the termination of pods when a StatefulSet is deleted. To achieve ordered and graceful termination of the pods in the StatefulSet, it is possible to scale the StatefulSet down to 0 prior to deletion.
apiVersion: v1
kind: Service
metadata:
  name: nginx
  labels:
    app: nginx
spec:
  ports:
  - port: 80
    name: web
  clusterIP: None
  selector:
    app: nginx
---
apiVersion: apps/v1
kind: StatefulSet
metadata:
  name: web
spec:
  selector:
    matchLabels:
      app: nginx # has to match .spec.template.metadata.labels
  serviceName: "nginx"
  replicas: 3 # by default is 1
  minReadySeconds: 10 # by default is 0
  template:
    metadata:
      labels:
        app: nginx # has to match .spec.selector.matchLabels
    spec:
      terminationGracePeriodSeconds: 10
      containers:
      - name: nginx
        image: registry.k8s.io/nginx-slim:0.24
        ports:
        - containerPort: 80
          name: web
        volumeMounts:
        - name: www
          mountPath: /usr/share/nginx/html
  volumeClaimTemplates:
  - metadata:
      name: www
    spec:
      accessModes: [ "ReadWriteOnce" ]
      storageClassName: "my-storage-class"
      resources:
        requests:
          storage: 1Gi
- You can set the
.spec.volumeClaimTemplatesfield to create aPersistentVolumeClaim. - StatefulSet Pods have a unique identity that consists of an ordinal, a stable network identity, and stable storage. The identity sticks to the Pod, regardless of which node it's (re)scheduled on.


Kubernetes offers multiple ways to manage application workloads, including StatefulSets and Deployments. Each is designed for specific use cases and provides different functionalities. Below is a detailed comparison.
- StatefulSet: Manages stateful applications. Ensures that each Pod in a set has a unique, persistent identity and stable storage.
- Deployment: Primarily for stateless applications. Manages a set of Pods where each Pod is generally identical to any other Pod in the set.
- StatefulSet:
- Suitable for applications requiring stable, unique network identities.
- Used when persistent storage is required across Pod restarts.
- Ideal for databases (e.g., MongoDB, Cassandra), distributed systems (e.g., Kafka), and applications where Pods need ordered startup/shutdown.
- Deployment:
- Used for stateless applications where any Pod can handle any request.
- Suitable for replicated services (e.g., web servers, REST APIs).
- Typically used when Pods do not require stable network identities or storage persistence.
- StatefulSet:
- Each Pod has a unique, stable network identity and hostname.
- Pods are named sequentially (e.g.,
podname-0,podname-1, etc.). - Provides ordered, deterministic deployment and scaling.
- Deployment:
- Pods are interchangeable, with no unique identities.
- No guaranteed ordering during scaling up or down.
- Pods are deployed and removed in a random order.
- StatefulSet:
- Uses PersistentVolumeClaims (PVCs) to ensure each Pod has a stable, unique storage that persists across rescheduling.
- Each Pod can have its own PVC, ensuring persistent storage tied to the Pod’s identity.
- Deployment:
- Typically does not provide persistent storage for Pods (unless used with shared PersistentVolumes).
- Pods do not maintain unique, stable storage; volumes are usually shared among Pods if necessary.
- StatefulSet:
- Scaling is done in an ordered fashion (Pod
n+1is only created after Podnis ready). - Scaling down happens in reverse order, which is useful for maintaining application consistency.
- Scaling is done in an ordered fashion (Pod
- Deployment:
- Pods are added or removed randomly without ordering constraints.
- Suitable for scaling stateless applications without the need for ordered shutdown/startup.
- StatefulSet:
- Supports rolling updates but with stricter controls.
- Allows gradual updates with controlled ordering to ensure stable state across updates.
- Deployment:
- Supports rolling updates by default with quicker, more flexible scaling and rollout.
- Ideal for fast updates where application state or order is not critical.
- StatefulSet:
- Pods have stable identities, so recovery is deterministic and consistent.
- Pods retain their identity on failover, maintaining state consistency.
- Deployment:
- Any Pod can replace another upon failure, which may lead to quicker recovery for stateless apps.
- Statelessness makes it easier to handle failure without risking data consistency.
- StatefulSet: Databases (MySQL, MongoDB), messaging queues (Kafka, RabbitMQ), distributed file systems (HDFS).
- Deployment: Web applications, API servers, microservices, load-balanced services.
apiVersion: apps/v1
kind: StatefulSet
metadata:
  name: example-statefulset
spec:
  selector:
    matchLabels:
      app: myapp
  serviceName: "myapp-service"
  replicas: 3
  template:
    metadata:
      labels:
        app: myapp
    spec:
      containers:
      - name: myapp-container
        image: myapp-image
        volumeMounts:
        - name: myapp-storage
          mountPath: "/data"
  volumeClaimTemplates:
  - metadata:
      name: myapp-storage
    spec:
      accessModes: [ "ReadWriteOnce" ]
      storageClassName: "standard"
      resources:
        requests:
storage: 1GiapiVersion: apps/v1
kind: Deployment
metadata:
name: example-deployment
spec:
replicas: 3
selector:
matchLabels:
app: myapp
template:
metadata:
labels:
app: myapp
spec:
containers:
- name: myapp-container
image: myapp-image
ports:
- containerPort: 80- A PersistentVolume is a piece of storage in the Kubernetes cluster that has been provisioned by an administrator or dynamically using StorageClasses.
- The admin must define StorageClass objects that describe named "classes" of storage offered in a cluster.
- When configuring a StorageClass object for persistent volume provisioning, the admin will need to describe the type of provisioner to use and the parameters that will be used by the provisioner when it provisions a PersistentVolume belonging to the class.
- The provisioner field must be specified as it determines what
volume pluginis used for provisioning PVs. - The parameters field contains the parameters that describe volumes belonging to the storage class. Different parameters may be accepted depending on the provisioner.
Key Attributes:
- Capacity: The size of the storage.
- Access Modes: Defines how the volume can be mounted (e.g., ReadWriteOnce, ReadOnlyMany, ReadWriteMany).
- Reclaim Policy: Determines what happens to the PV after the PVC is deleted (e.g., Retain, Recycle, Delete).
- StorageClass: Links the PV to a StorageClass for dynamic provisioning.
AWS EBS PV
apiVersion: storage.k8s.io/v1
kind: StorageClass
metadata:
  name: ebs-sc
provisioner: ebs.csi.aws.com
volumeBindingMode: WaitForFirstConsumer
parameters:
  csi.storage.k8s.io/fstype: xfs
  type: io1
  iopsPerGB: "50"
  encrypted: "true"
allowedTopologies:
- matchLabelExpressions:
  - key: topology.ebs.csi.aws.com/zone
    values:
    - us-east-2c
---
apiVersion: v1
kind: PersistantVolume
metadata:
name: example-volume
labels:
type: local
spec:
storageClassName: ebs-sc
capacity:
storage: 50Gi
accessModes:
- ReadWriteOnce
hostpath:
path: "/mnt/data"****PersistantVolume without StorageClass.****
apiVersion: v1
kind: PersistentVolume
metadata:
  name: my-manual-pv
spec:
  capacity:
    storage: 5Gi
  volumeMode: Filesystem
  accessModes:
    - ReadWriteOnce
  persistentVolumeReclaimPolicy: Retain

  # Adding a NFS PV
  nfs:
    server: nfs-server.default.svc.cluster.local
    path: "/path/to/data"

  # Or you can add existing EBS volume as PV
  awsElasticBlockStore:
    volumeID: <volume-id>
fstype: ext4apiVersion: v1
kind: PersistentVolume
metadata:
name: pv-log
spec:
persistentVolumeReclaimPolicy: Retain
accessModes:
- ReadWriteMany
capacity:
storage: 100Mi
hostPath:
path: /pv/log- A PersistentVolumeClaim is a request for storage by a user. It specifies size, access modes, and optionally, a StorageClass. Kubernetes matches PVCs to PVs based on these specifications
Key Attributes:
- Requested Storage: The size of the storage needed.
- Access Modes: How the storage should be accessed.
- StorageClass: (Optional) Specifies the desired StorageClass for dynamic provisioning.
- every
PVCbinds to a singlePVk8s findsPVwith sufficient requirements. you can also use thelabelsto bind to the right volume. - if no new
PVis available thenPVCwill go inpendingstate. - multiple
PVCscannot bind to the samePV.- A PVC (Persistent Volume Claim) is exclusively bound to a PV (Persistent Volume). The binding is a one-to-one mapping, using a ClaimRef, which is a bi-directional binding between the PersistentVolume and the PersistentVolumeClaim.
apiVersion: v1
kind: PersistentVolumeClaim
metadata:
  name: pvc-example
spec:
  accessModes:
    - ReadWriteOnce
  resources:
    requests:
      storage: 5Gi
  storageClassName: ebs-sc # Optinal
persistentVolumeReclaimPolicy has three option retain, recycle and deleted
The persistentVolumeReclaimPolicy in Kubernetes specifies what should happen to a PersistentVolume (PV) when its associated PersistentVolumeClaim (PVC) is deleted.
RetainUse Case: Useful when data should be preserved after a Pod stops using it, such as for auditing or backup purposes. Administrators can later manually manage the volume (e.g., delete or reassign it to a new claim).DeleteUse Case: Common in cloud environments where dynamically provisioned volumes are frequently created and removed. Ideal when storage needs to be automatically freed up to avoid unnecessary costs.Recycle(Deprecated in many Kubernetes versions) Use Case: Used in older Kubernetes setups where basic cleansing of data on release was acceptable. It is now mostly replaced by more secure methods.
how to use PVC inside the POD defination
apiVersion: v1
kind: Pod
metadata:
  name: my-pod
spec:
  containers:
  - name: my-container
    image: nginx

    # This subsection defines how volumes are mounted into the container.
    volumeMounts:

    # mount name
    - name: my-storage

      # Mount Path inside container
      mountPath: "/usr/share/nginx/html"
  volumes:
  - name: my-storage
    persistentVolumeClaim:
      claimName: my-manual-pvc
Note:
spec.containers.volumeMounts.namemust be same asspec.volumes.nameand policy should be same for bothPVandPVCto bind else the pvc will be inpendingstate, if pod is using thePVCand you delete thePVCthen thePVCwill stuck in terminating state once thepodis deletedpvcwill also delete andPVwill be released
- A StorageClass provides a way to describe the "classes" of storage available in a Kubernetes cluster.
- StorageClasses help Kubernetes dynamically provision PVs.
- If you are leveraging dynamic provisioning, you should create the StorageClass first. This is because the StorageClass is responsible for dynamically provisioning the PersistentVolumes when a PersistentVolumeClaim (PVC) is created.
- A StorageClass provides a way for administrators to describe the classes of storage they offer
- It abstracts the underlying storage provider (like AWS EBS, GCE PD, NFS, etc.) and allows dynamic provisioning of PVs.
- kubernetes communicates with the Cloud providers API to provisions a volume.
Key Attributes:
- Provisioner: Specifies the volume plugin (e.g., kubernetes.io/aws-ebs, kubernetes.io/gce-pd, kubernetes.io/nfs).
- Parameters: Configuration options specific to the provisioner.
- Reclaim Policy: Defaults for dynamically provisioned PVs.
apiVersion: storage.k8s.io/v1
kind: StorageClass
metadata:
  name: ebs-sc
provisioner: kubernetes.io/aws-ebs
parameters: # This is provider specific
  type: gp2
  zones: us-east-1a,us-east-1b
reclaimPolicy: RetainapiVersion: v1
kind: PersistentVolumeClaim
metadata:
name: pvc-example
spec:
accessModes:
- ReadWriteOnce
resources:
requests:
storage: 5Gi
storageClassName: ebs-sc-
Provisioner
-
This is the specific plugin or driver that handles the creation logic.
Examples:
kubernetes.io/aws-ebs, kubernetes.io/gce-pd, or CSI drivers like ebs.csi.aws.com.
-
-
Parameters
-
These are key-value pairs passed directly to the underlying storage provider. Kubernetes itself doesn't "understand" them; it just forwards them.
Examples:
Disk type (gp2 vs io1), replication factor, file system type (ext4 vs xfs).
-
-
ReclaimPolicy
-
Determines what happens to the underlying physical disk when the user deletes their PVC.
-
Delete (Default): The physical disk (e.g., AWS EBS volume) is destroyed. Data is lost.
-
Retain: The PV object is released, but the physical disk remains. An admin must manually delete it or recover the data.
-
-
VolumeBindingMode
-
This controls when the volume is actually created.
-
Immediate (Default): The volume is created as soon as the PVC is created, even if no Pod is using it yet. This can be bad for multi-zone clusters (e.g., the volume gets created in Zone A, but the Pod gets scheduled in Zone B).
-
-
WaitForFirstConsumer:
- The volume creation is delayed until a Pod actually tries to use the PVC. This ensures the volume is created in the same zone where the Pod is scheduled.
Workflow:
- Create the StorageClass: Define the storage characteristics and provisioner.
- Create the PVC: Reference the StorageClass in the PVC specification.
- Kubernetes Automatically Creates the PV: Kubernetes uses the provisioner to create the storge.
- StorageClass First: If you're using dynamic provisioning, you should create the StorageClass first. This is because when a PersistentVolumeClaim (PVC) is created with a storageClassName, Kubernetes uses the StorageClass to dynamically provision a PersistentVolume that matches the PVC's requirements.
- PersistentVolume (PV) : This will be automatically created by
StorageClass - PVC Creation Triggers PV Creation: After the StorageClass is defined, the PVC can be created. Kubernetes will then automatically create a PV based on the specifications in the StorageClass and bind it to the PVC.
- Give
StorageClassname inPVCdefination
- Give
Order:
- StorageClass
- PersistentVolume (PV)
- PersistentVolumeClaim (PVC)
- PersistentVolume First: In the case of static provisioning, you manually create the PVs first. These PVs are pre-provisioned by an administrator and are available in the cluster for any PVC to claim.
- PVC Creation Binds to PV: After the PVs are created, you can create PVCs that match the specifications of the available PVs. Kubernetes will bind the PVC to a matching PV.
Order:
- PersistentVolume (PV)
- PersistentVolumeClaim (PVC)
kubectl get pods --selector key=value --no-headers | wc -l
kubectl get pods --selector env=prod,env=prod,tier=frontend
- Taints are placed on Nodes
- Tolerations is placed on Pods
- Tolerations allow the scheduler to schedule pods with matching taints.
- if Taint are placed on the specific node it will not allow a pod without tolerence tobe scheduled on that Node
- if we place the tolerence on the specific pod then only it will be able to scheduled on the node else not
- Taints are the opposite -- they allow a node to repel a set of pods.
- Taints and tolerations work together to ensure that pods are not scheduled onto inappropriate nodes.
- One or more taints are applied to a node; this marks that the node should not accept any pods that do not tolerate the taints
- Taints and Tolerations does not tell pod to go on specific node
- Taints and Tolerations only tells accept pods on the node with certain tolerations.
- if you want to restrict a certain pod on a single node then you have to use the node Affinity.
- Taint is alredy placed on masterNode which tells the scduler not to schedule pods on the masterNode to view which taint effect is applied on the master node use below command.
kubectl describe node kubemaster | grep Taint
- NoExecute
- Pods that do not tolerate the taint are evicted immediately
- Pods that tolerate the taint without specifying
tolerationSecondsin their toleration specification remain bound forever - Pods that tolerate the taint with a specified
tolerationSecondsremain bound for the specified amount of time. After that time elapses, the node lifecycle controller evicts the Pods from the node - Pods currently running on the node are evicted if does not match the tolerence.
NoExecuteeffect can specify an optionaltolerationSecondsfield that dictates how long the pod will stay bound to the node after the taint is added
- NoSchedule
- No new Pods will be scheduled on the tainted node unless they have a matching toleration. Pods currently running on the node are not evicted.
- PreferNoSchedule
PreferNoScheduleis a "preference" or "soft" version ofNoSchedule.- The control plane will try to avoid placing a Pod that does not tolerate the taint on the node, but it is not guaranteed.
To Apply the Taint on the Node
kubectl taint nodes node1 key1=value1:NoSchedule
To remove the taint from the node:
kubectl taint nodes node1 key1=value1:NoSchedule-
kubectl taint nodes node1 key1=value1:NoSchedule
kubectl taint nodes node1 key1=value1:NoExecute
kubectl taint nodes node1 key2=value2:NoSchedule
apiVersion: v1
kind: Pod
metadata:
  name: nginx
  labels:
      env: test
spec:
  containers:
  - name: nginx
    image: nginx
    imagePullPolicy: IfNotPresent

# add tolerence to Pod
  tolerations:
  - key: "key1"
    operator: "Equal"
    value: "value1"
effect: "NoSchedule"- Node selectors helps in scheduling the pod on specific node based on labels assigned to node and the pods
- suppose we have Three nodes namely Large, Small with labels as size = large/small.
- We can use this label information to schedule our pods accordingly.
Example :
apiVersion: v1
kind: Pod
metadata:
  name: nginx
  labels:
      env: test
spec:
  containers:
  - name: nginx
    image: nginx

# Apply node selector to run pod on node with size=large label on it
  nodeSelector:
size: largeAdd a label to a particular node
kubectl label nodes <node_name> key=value
NodeSelector will not be able to help in complex senerios such as
- size=large or size=small
- size !=medium (not equal)
- with the help of Node Affinity , you can control the scheduling of pods onto nodes more granularly using various criteria like
- It is an extension of node selectors which allows you to specify more flexible rules about where to place your pods by specifying certain requirements.
Example: This manifest describes a Pod that has a requiredDuringSchedulingIgnoredDuringExecution node affinity,size=large or size=small. This means that the pod will get scheduled only on a node that has a size=large or size=small
apiVersion: v1
kind: Pod
metadata:
  name: nginx
spec:
  affinity:
    nodeAffinity:
      requiredDuringSchedulingIgnoredDuringExecution:
        nodeSelectorTerms:
        - matchExpressions:
          - key: size
            operator: In
            values: # The Pod will scheduled on the nodes that have at least one of these value.
            - large
            - small
  containers:
  - name: nginx
    image: nginx
imagePullPolicy: IfNotPresentrequiredDuringSchedulingIgnoredDuringExecution- Pods with this affinity rule will only be scheduled on nodes that meet the specified requirements. However, if a node loses the label that made it eligible after the pod is scheduled, the pod will still continue to run on that node.
PreferredDuringSchedulingIgnoredDuringExecution- Pods with this affinity rule will prefer to be scheduled on nodes that meet the specified requirements, but they are not strictly required to. If no nodes match the preferred requirements, the pod can still be scheduled on other nodes.
| Syntax | DuringScheduling | DuringExecution |
|---|---|---|
| Type1 | Required | Ignored |
| Type2 | preferred | Ignored |
| Type3 | Required | Required |
-
You can use both taints and tolerations & Node affinity to granular control over the Pod scheduling on the specific nodes.
-
what if we applied taint to specific node and Node Affinity to a pod to be schedule on the specific node only without tolerance set what will happen?
- When the scheduler attempts to place the pod onto a node, it evaluates the Node Affinity rules against the labels of each node in the cluster.
- If there is a node that meets the Node Affinity requirements specified in the pod's configuration and doesn't have a taint that repels the pod (i.e., the node matches the Node Affinity and doesn't have any taints), the pod will be scheduled on that node.
- However, if the node with the matching Node Affinity also has the taint that the pod lacks tolerations for, the pod won't be scheduled on that node due to the taint-repelling behavior. In this case, the pod won't be scheduled anywhere unless there is another node in the cluster that meets the Node Affinity requirements and doesn't have the taint applied.
-
Requests: Requests specify the minimum amount of resources (CPU and memory) that a pod needs to run.
- When a pod is scheduled onto a node, Kubernetes ensures that the node has enough available resources to satisfy the pod's resource requests.
- Requests are used by the scheduler to determine the best node for placing a pod.
-
Limits: Limits, on the other hand, specify the maximum amount of resources that a pod can consume.
- Kubernetes enforces these limits to prevent pods from using more resources than allowed, which helps in maintaining stability and preventing resource contention.
- If a pod exceeds its specified limits, Kubernetes may take actions such as throttling or terminating the pod.
- Pod cannot exceed the CPU limit but can exceed the Memory Limit in that case K8s will try to Terminate or kill the Pod when it finds that the pod is using more resources than allowed
OOM(out of memory (OOM) error)OOMKilledmeans the pod has been killed by Out of Memory. - if you donot specify the Request the Limit will be
Request = Limit
- No Request and No Limit
- This scenario is suitable for non-critical applications or experiments where resource requirements are flexible, and the pod can utilize whatever resources are available on the node without any constraints. However, it can lead to potential resource contention issues if other pods on the node require resources.
- No Request and Limit
- This scenario is useful when you want to constrain the resource usage of a pod to prevent it from using excessive resources and impacting other pods on the node. However, without a request, Kubernetes scheduler may place the pod on a node without considering its resource needs, potentially leading to inefficient resource allocation.
- Request and Limit
- This is the most common and recommended configuration. By specifying both requests and limits, Kubernetes can ensure that the pod gets scheduled on a node with sufficient resources and enforce resource constraints to maintain stability and fairness within the cluster.
- Request and No Limits
- This scenario is suitable when you want to ensure that the pod gets scheduled on a node with sufficient resources based on its requirements, but you're not concerned about limiting its resource usage. It allows the pod to scale up its resource consumption based on demand without strict constraints, which can be useful for certain workloads with variable resource requirements.
---
apiVersion: v1
kind: Pod
metadata:
  name: frontend
spec:
  containers:
  - name: app
    image: images.my-company.example/app:v4
    resources:
      requests:
        memory: "64Mi"
        cpu: "1"
      limits:
        memory: "128Mi"
cpu: "500m"Note:
Kubernetes doesn't allow you to specify CPU resources with a precision finer than
1m or 0.001 CPU. To avoid accidentally using an invalid CPU quantity, it's useful to specify CPU units using the milliCPU form instead of the decimal form when using less than1 CPUunit. For example, you have a Pod that uses5m or 0.005 CPUand would like to decrease its CPU resources. By using the decimal form, it's harder to spot that0.0005 CPUis an invalid value, while by using the milliCPU form, it's easier to spot that0.5mis an invalid value. Limits and requests formemoryare measured in bytes. You can express memory as a plain integer or as a fixed-point number using one of these quantity suffixes: E, P, T, G, M, k. You can also use the power-of-two equivalents: Ei, Pi, Ti, Gi, Mi, Ki. For example, the following represent roughly the same value:128974848, 129e6, 129M, 128974848000m, 123MiPay attention to the case of the suffixes. If you request400mof memory, this is a request for 0.4 bytes. Someone who types that probably meant to ask for 400 mebibytes (400Mi) or 400 megabytes (400M).
- DeamonSet are simillar to ReplicaSets but inly difference is that DeamonSet ensure that every node has at least one instance of a pod running.
- when the node gets created DeamonSet automatically creates the pod on the Node.
- Pods created by the DeamonSet are ignored by the Kube-scheduler.
- deamonSets does not support scalling inside the Node
- it supports the Rolling update like Deployments.
- running a cluster storage daemon on every node
- running a logs collection daemon on every node
- running a node monitoring daemon on every node
- one DaemonSet, covering all nodes, would be used for each type of daemon.


apiVersion: apps/v1
kind: DaemonSet
metadata:
  name: fluentd-elasticsearch
  namespace: kube-system
  labels:
    k8s-app: fluentd-logging
spec:
  selector:
    matchLabels:
      name: fluentd-elasticsearch
  template:
    metadata:
      labels:
        name: fluentd-elasticsearch
    spec:
      tolerations:
      # these tolerations are to have the daemonset runnable on control plane nodes
      # remove them if your control plane nodes should not run pods
      - key: node-role.kubernetes.io/control-plane
        operator: Exists
        effect: NoSchedule
      - key: node-role.kubernetes.io/master
        operator: Exists
        effect: NoSchedule
      containers:
      - name: fluentd-elasticsearch
        image: quay.io/fluentd_elasticsearch/fluentd:v2.5.2
        resources:
          limits:
            memory: 200Mi
          requests:
            cpu: 100m
            memory: 200Mi
        volumeMounts:
        - name: varlog
          mountPath: /var/log
      # it may be desirable to set a high priority class to ensure that a DaemonSet Pod
      # preempts running Pods
      # priorityClassName: important
      terminationGracePeriodSeconds: 30
      volumes:
      - name: varlog
        hostPath:
          path: /var/log
kubectl apply -f DeamonSet.yml
If you specify a
.spec.template.spec.nodeSelector, then the DaemonSet controller will create Pods on nodes which match that node selector. Likewise if you specify a.spec.template.spec.affinity, then DaemonSet controller will create Pods on nodes which match that node affinity. If you do not specify either, then the DaemonSet controller will create Pods on all nodes.
- Static Pods are managed directly by the kubelet daemon on a specific node, without the API server observing them.
- kube-Scheduler ignore the Static pods
- Static pod are used to depoly the Control plane pods
- static pods are only created by kubelet.
- Static Pods are always bound to one Kubelet on a specific node.
- to Identify the Static pods, they always have a nodeName at the end. ex- etcd-
controlplane, kube-apiserver-controlplane, kube-controller-manager-controlplane, kube-scheduler-controlplaneor you can refer to theOwerReferencein the Pod defination file. - Kubelet does not manage the Deployment and Replicasset it only manages the Pod
- Static pods are visible to the Kube-Apiserver, but does not control from there
- Kubelet also runs on the master node in Kubernetes to provision the master components as static pods.
There are two way to craete a Static pod
- Filesystem-hosted static Pod manifest
- Web-hosted static pod manifest
- Manifests are standard Pod definitions in JSON or YAML format in a specific directory. Use the
staticPodPath: <the directory>field in the kubelet configuration file, which periodically scans the directory and creates/deletes static Pods as YAML/JSON files appear/disappear there. - to modify the kubelet use the
KubeletConfigurationYAML file which is the recommended way.
apiVersion: kubelet.config.k8s.io/v1beta1
kind: KubeletConfiguration
address: "192.168.0.8"
port: 20250
serializeImagePulls: false
evictionHard:
    memory.available:  "100Mi"
    nodefs.available:  "10%"
    nodefs.inodesFree: "5%"
    imagefs.available: "15%"
    staticPodPath: "/etc/kubernetes/manifests"
to apply this file
kubectl apply -f kubelet-config.yaml
-
staticPodPath: "/etc/kubernetes/manifests"is were the static-pod manifest are stored this path is not same always refer the kubelet config file for the mention pathcat /var/lib/kubelet/config.yamllook forstaticPodPath
or
-
--pod-manifest-path=/etc/kubernetes/manifests/(command line method for creating the static pod)systemctl restart kubelet
-
kubectl run --restart=Never --image=busybox static-busybox --dry-run=client -o yaml --command -- sleep 1000 > /etc/kubernetes/manifests/static-busybox.yaml
controlplane ~ ➜  ls -lrt /etc/kubernetes/manifests/
total 16
-rw------- 1 root root 2406 Apr  7 16:35 etcd.yaml
-rw------- 1 root root 1463 Apr  7 16:35 kube-scheduler.yaml
-rw------- 1 root root 3393 Apr  7 16:35 kube-controller-manager.yaml
-rw------- 1 root root 3882 Apr 7 16:35 kube-apiserver.yaml- to ssh into any node within k8s cluster you can use the command
ssh <Node-name>/<Node-IP>
- K8s comes with a single default scheduler but as the k8s is highly extensible, If the default scheduler does not suit your needs you can implement your own scheduler.
- you can even run multiple schedulers simultaneously alongside the default scheduler.
STEP 1:
- Package your scheduler binary into a container image.
- Clone the Kubernetes source code from GitHub and build the source.
Docker Build -tandDocker Pushto push the Image to Docker Hub (or another registry). refer k8s documentation
Docker File
FROM busybox
ADD ./_output/local/bin/linux/amd64/kube-scheduler /usr/local/bin/kube-scheduler
STEP 2: Define a Kubernetes Deployment for the scheduler
- you have your scheduler in a container image
- create a pod/Deployment configuration for it and run it in your Kubernetes cluster.
- Save it as my-scheduler.yaml
- in the deployment use this
---
# **my-scheduler-config.yaml**
apiVersion: kubescheduler.config.k8s.io/v1
kind: KubeSchedulerConfiguration
profiles:
  - schedulerName: my-scheduler
leaderElection:
  leaderElect: false

---
# **my-scheduler-configmap.yaml**
apiVersion: v1
data:
  my-scheduler-config.yaml: |
    apiVersion: kubescheduler.config.k8s.io/v1
    kind: KubeSchedulerConfiguration
    profiles:
      - schedulerName: my-scheduler
    leaderElection:
      leaderElect: false
kind: ConfigMap
metadata:
  creationTimestamp: null
  name: my-scheduler-config
  namespace: kube-system

---
# **my-scheduler.yml**
apiVersion: v1
kind: Pod
metadata:
  labels:
    run: my-scheduler
  name: my-scheduler
  namespace: kube-system
spec:
  serviceAccountName: my-scheduler
  containers:
  - command:
    - /usr/local/bin/kube-scheduler
    - --config=/etc/kubernetes/my-scheduler/my-scheduler-config.yaml
    image: registry.k8s.io/kube-scheduler:v1.29.0
    livenessProbe:
      httpGet:
        path: /healthz
        port: 10259
        scheme: HTTPS
      initialDelaySeconds: 15
    name: kube-second-scheduler
    readinessProbe:
      httpGet:
        path: /healthz
        port: 10259
        scheme: HTTPS
    resources:
      requests:
        cpu: '0.1'
    securityContext:
      privileged: false
    volumeMounts:
      - name: config-volume
        mountPath: /etc/kubernetes/my-scheduler
  hostNetwork: false
  hostPID: false
  volumes:
    - name: config-volume
      configMap:
        name: my-scheduler-config
STEP 3: How to use the custom schduler into pod definations.
---
apiVersion: v1
kind: Pod
metadata:
  name: frontend
spec:
  containers:
  - name: nginx
    image: nginx

  # This is how you can add the custom scheduler to pod.
schedulerName: my-schedulerExample:
controlplane ~ ➜  kubectl get pods -A
NAMESPACE      NAME                                   READY   STATUS    RESTARTS   AGE
kube-flannel   kube-flannel-ds-nssdp                  1/1     Running   0          10m
kube-system    coredns-69f9c977-25wxh                 1/1     Running   0          10m
kube-system    coredns-69f9c977-9v84m                 1/1     Running   0          10m
kube-system    etcd-controlplane                      1/1     Running   0          11m
kube-system    kube-apiserver-controlplane            1/1     Running   0          11m
kube-system    kube-controller-manager-controlplane   1/1     Running   0          10m
kube-system    kube-proxy-zhj22                       1/1     Running   0          10m
kube-system    kube-scheduler-controlplane            1/1     Running   0          10m
kube-system    **my-scheduler**                           1/1     Running   0          2m22s
kubectl get events -o wide
kubectl logs <scheduler_name> -n <name_space>
- Suppose if you have multiple schedulers you can combine all those schedulers to use same binary rather than creating multiple binaries, this can be achived with the help of Scheduler Profile in latest k8s versions.
- this is a efficient way to use and configure mutiple schedulers in k8s cluster.
- How a Pod gets scheduled on the nodes
- Sceduling Queue
- Filtering
- Scoring
- Binding
%20Practice%20Exam%20Tests.png)
- you can set the priority of pod tobe scheduled
- To ensure critical workloads get resources before less important ones
- To allow Kubernetes to evict lower-priority Pods if needed to make space for high-priority ones
- To manage scheduling order during resource contention
---
apiVersion: scheduling.k8s.io/v1
kind: PriorityClass
metadata:
  name: high-priority
value: 1000000
globalDefault: false
description: "This priority class should be used for XYZ service pods only."

---
apiVersion: v1
kind: Pod
metadata:
  name: frontend
spec:
  priorityClass: high-priority
  containers:
  - name: nginx
    image: nginx
  resources:
    requests:
      memory: 1Gi
cpu: 10- Filter which nodes are not suitable for running the pod, e.g., lack of resource or taints and tolerations
- after the filtering phase Nodes which are eligible will go through the scoring phase . The node with the highest score is selected.
- Score means Suitable to run the Pod and have more available free resource after scheduling.
- The scheduler assigns a score to each Node that survived filtering, basing this score on the active scoring rules.
- The nodes which have a good score are selected for binding.
- Scheduling Queue
- PrioritySort
- Filtering
- NodeResourcesFit
- NodeName
- NodeUnschedule
- Scoring
- NodeResourcesFit
- ImageLocality
- Binding
- DefaultBinder
These Plugins are pluged to Extention points
- queueSort
- filter
- score
- bind
- Kubernetes uses a
meteric Serverwhich connects withkubeletpresent on every node to gather metrics Metric Serverstores the datain-memoryfor historical data you need more advance monitoring solutions.kubeletuses a subcomponentcAdvisor(Container Advisor) to fetch the performance metrics tometrics server
Metric Serveris available on each node to gather logs.- Metric server can be enabled using
minikube addons enable metrics-serveron minikube only - for Others to deploy metric server
git clone https://github.com/kubernetes-incubator/metrics-server.gitkubectl create -f deploy/1.8+/kubectl top nodeto view resource (cpu and Memory) consumption of each node of cluster.
controlplane kubernetes-metrics-server on master ➜ kubectl top node
NAME CPU(cores) CPU% MEMORY(bytes) MEMORY%
controlplane 258m 0% 1084Mi 0%
node01 118m 0% 268Mi 0%
kubectl top podto view resources consumption of pods.
controlplane kubernetes-metrics-server on master ➜ kubectl top pod
NAME CPU(cores) MEMORY(bytes)
elephant 15m 32Mi
lion 1m 18Mi
rabbit 102m 14Mi
- to view logs of a pod LIVE
-fkubectl logs -f <pod-name>
- to view logs of a pod in a specific container
kubectl logs <pod-name> -c <container-name>
- to view logs of a pod in a specific container and follow the logs
kubectl describe podto find the container name
Name:         my-pod
Namespace:    default
Priority:     0
Node:         node1/10.0.0.1
Start Time:   Tue, 01 Mar 2023 10:00:00 +0000
Labels:       app=my-app
Annotations:  <none>
Status:       Running
IP:           10.0.0.2
IPs:
  IP:  10.0.0.2
Containers:
  **my-container:**
    Container ID:   docker://abcdefg1234567890
    Image:          my-image:latest
    Image ID:       docker-pullable://my-image@sha256:abcdefg1234567890
    Port:           8080/TCP
    Host Port:      0/TCP
    State:          Running
      Started:      Tue, 01 Mar 2023 10:00:01 +0000
- Users expect applications to be available all the time, and developers are expected to deploy new versions of them several times a day. In Kubernetes this is done with rolling updates
- A rollinrg update allows a Deployment update to take place with zero downtime
- It does this by incrementally replacing the current Pods with new ones.
- Kubernetes waits for those new Pods to start before removing the old Pods.
- In Kubernetes, updates are versioned and any Deployment update can be reverted to a previous (stable) version.
- the Service will load-balance the traffic only to available Pods during the update.
- when updates happens the new set of replicas are created one by one and the old set of replicas are down to 0 one by one in rolling update. when doing the undo old ones are up and new ones are down to zero one by one.
> kubectl get replicasets
NAME DESIRED CURRENT READY AGE
myapp-deployment-67c749c58c 0 0 0 22m
myapp-deployment-7d57dbdb8d 5 5 5 20m
Rolling updates allow the following actions:
- Promote an application from one environment to another (via container image updates)
- Rollback to previous versions
- Continuous Integration and Continuous Delivery of applications with zero downtime

to update the image
kubectl set image deployment/<deployment-name> <container-name>=<new-image>
To view the status of application upgrade
kubectl rollout status deployment/<deployment-name>
> kubectl rollout status deployment/myapp-deployment
Waiting for rollout to finish: 0 of 10 updated replicas are available...
Waiting for rollout to finish: 1 of 10 updated replicas are available...
Waiting for rollout to finish: 2 of 10 updated replicas are available...
Waiting for rollout to finish: 3 of 10 updated replicas are available...
Waiting for rollout to finish: 4 of 10 updated replicas are available...
Waiting for rollout to finish: 5 of 10 updated replicas are available...
Waiting for rollout to finish: 6 of 10 updated replicas are available...
Waiting for rollout to finish: 7 of 10 updated replicas are available...
Waiting for rollout to finish: 8 of 10 updated replicas are available...
Waiting for rollout to finish: 9 of 10 updated replicas are available...
deployment "myapp-deployment" successfully rolled out
To view the history of application upgrade
kubectl rollout history deployment/<deployment-name>
> kubectl rollout history deployment/myapp-deployment
deployments "myapp-deployment"
REVISION CHANGE-CAUSE
1        <none>
2        kubectl apply --filename=deployment-definition.yml --record=true
To rollback to a previous version
kubectl rollout undo deployment/<deployment-name>
- The Deployment controller supports two different strategies for rolling updates:
-
Recreate
- In this strategy, all existing Pods are killed one at a time, and new ones are created to replace them.
- In the strategy user will faces the downtime of application during the update.
-
Rolling Update
- In this strategy, new Pods are created and the old ones are killed one at a time.
- In this strategy, user will not faces the downtime of application during the update.


There are two ways to update the deployment
-
Manually
- The user can manually update the deployment by changing the image version in the deployment manifest.
kubectl edit deployment <deployment-name> - or using commandline
kubectl set image deployment/<deployment-name> <container-name>=<new-image-name>
- The user can manually update the deployment by changing the image version in the deployment manifest.
-
Automatically
- The user can also update the deployment automatically by using the image update policy.
Difference Between ENTRYPOINT and CMD in Docker and use case.
CMDis used to run the command when the container is started.- The
CMDinstruction specifies the default command or arguments that will be executed by the ENTRYPOINT if no other command is provided when running the container. - If you use both
ENTRYPOINTandCMDin a Dockerfile, the CMD instruction will provide the default arguments for theENTRYPOINT.
- The
ENTRYPOINTis used to run the command when the container is started.- It is the preferred way to define the main command for a Docker container.
- If you provide additional arguments when running the container, they will be appended to the
ENTRYPOINTinstruction. - The ENTRYPOINT cannot be overridden by arguments provided during container runtime unless you use the
--entrypointflag.
Command:
docker run ubuntu [COMMAND]

Example:
# Example 1: Using ENTRYPOINT
FROM ubuntu
ENTRYPOINT ["sleep"]

# If you run: docker run my-image 10
# It will execute: sleep 10

# If you run: docker run my-image sleep2.0 10
# It willnot execute: sleep 10 (cannot replace sleep the default ENTRYPOINT) need to use `--entrypoint sleep2.0` to replace it in commandline
docker run --entrypoint sleep2.0 my-image 10
# Example 2: Using CMD
FROM ubuntu
CMD ["sleep", "5"]

# If you run: docker run my-image
# It will execute: sleep 5

# If you run: docker run my-image 10
# It will execute: sleep 10 (overriding the default CMD)

# If you run: docker run my-image sleep2.0 10
# It will execute: sleep2.0 10 (replace the default CMD)
# Example 3: Using ENTRYPOINT and CMD together
FROM ubuntu
ENTRYPOINT ["sleep"]
CMD ["5"]

# If you run: docker run my-image
# It will execute: sleep 5 (CMD provides the default argument)

# If you run: docker run my-image 10
# It will execute: sleep 10 (additional arguments are appended)- we can use
commandto override theENTRYPOINTfrom pod defination,works like--entrypoint - we can use
argsto override theCMDfrom pod defination

Example 1 of Command and args
---
apiVersion: v1
kind: Pod
metadata:
  name: frontend
spec:
  priorityClass: high-priority
  containers:
  - name: nginx
    image: nginx
    command: ["sleep", "5000"]
# OR
    command:
    - "sleep"
    - "5000"
Example 2 of Command and args
---
apiVersion: v1
kind: Pod
metadata:
  name: frontend
spec:
  priorityClass: high-priority
  containers:
  - name: nginx
    image: nginx
    command: ["sleep"]
args: ["5000"]Note: Both the
commandandargsneed to string not number
- ConfigMap can pass the key value pair to the pod
- ConfigMap can be used to pass the configuration to the pod
- it helps in managing the environment variables in the pod defination centrally
- A ConfigMap is an API object used to store non-confidential data in key-value pairs
- Pods can consume ConfigMaps as environment variables, command-line arguments, or as configuration files in a volume.
- The Pod and the ConfigMap must be in the same namespace.
- ConfigMap does not provide secrecy or encryption
- A ConfigMap allows you to decouple environment-specific configuration from your container images, so that your applications are easily portable.'
- a ConfigMap has
dataandbinaryDatafields rather than spec. - The data field is designed to contain
UTF-8strings while the binaryData field is designed to contain binary data asbase64-encodedstrings. - The Kubernetes feature
ImmutableSecrets and ConfigMaps provides an option to set individual Secrets and ConfigMaps as immutable.- protects you from accidental (or unwanted) updates that could cause applications outages
- improves performance of your cluster by significantly reducing load on kube-apiserver, by closing watches for ConfigMaps marked as immutable.
apiVersion: v1
kind: ConfigMap
metadata:
  ...
data:
  ...
immutable: trueNote: Once a ConfigMap is marked as
immutable, it is not possible to revert this change nor to mutate the contents of the data or the binaryData field. You can only delete and recreate the ConfigMap. Because existing Pods maintain a mount point to the deleted ConfigMap, it is recommended to recreate these pods.
Note: A ConfigMap is not designed to hold large chunks of data. The data stored in a ConfigMap cannot exceed
1 MiB. If you need to store settings that are larger than this limit, you may want to consider mounting a volume or use a separate database or file service.
- Imperative
- Adding config map through command line
- kubectl create configmap
configmap-name--from-literal=key=value--from-literal=key2=value2 - kubectl create configmap
configmap-name--from-file=path-to-file - kubectl create configmap
configmap-name--from-file=app.config.properties
- kubectl create configmap
- Adding config map through command line
- Diclarative
- Adding through the pod defination
apiVersion: v1
kind: ConfigMap
metadata:
  name: game-demo
data:
  # property-like keys; each key maps to a simple value
  player_initial_lives: "3"
  ui_properties_file_name: "user-interface.properties"

  # file-like keys
  game.properties: |
    enemy.types=aliens,monsters
    player.maximum-lives=5
  user-interface.properties: |
    color.good=purple
    color.bad=yellow
    allow.textmode=true
command :
kubectl create -f configmap.ymlkubectl describe configmapskubectl get configmaps
There are four different ways that you can use a ConfigMap to configure a container inside a Pod:
1. Inside a container command and args
2. Environment variables for a container
3. Add a file in read-only volume, for the application to read
4. Write code to run inside the Pod that uses the Kubernetes API to read ConfigMap
- Using
envin pod defination
---
apiVersion: v1
kind: Pod
metadata:
  name: frontend
spec:
  priorityClass: high-priority
  containers:
  - name: nginx
    image: nginx
    env:
      - name: USERNAME
        value: admin
      - name: APP_COLOUR
value: Pink- adding env varibles as
USERNAME = adminandAPP_COLOUR = pinkin pod defination directly.
- Using
valueFromin pod defination
---
apiVersion: v1
kind: Pod
metadata:
  name: frontend
spec:
  priorityClass: high-priority
  containers:
  - name: nginx
    image: nginx
    env:                      # Define the environment variable
      - name: APP_COLOUR      # Notice that the case is different here
                              # from the key name in the ConfigMap.
        valueFrom:
          configMapKeyRef:
            name: APP         # The ConfigMap this value comes from.
            key: frontend     # The key to fetch.
      - name: UI_PROPERTIES_FILE_NAME
        valueFrom:
          configMapKeyRef:
            name: game-demo                 # different configmap
key: ui_properties_file_name # key to fetch the value of- The value of
frontendwill be assigned toAPP_COLOURenv variable fromAPPconfigmap - The value of
ui_properties_file_namewill be assigned toUI_PROPERTIES_FILE_NAMEenv variable fromgame-democonfigmap
- Using
envFromin pod defination
---
apiVersion: v1
kind: Pod
metadata:
  name: frontend
spec:
  priorityClass: high-priority
  containers:
  - name: nginx
    image: nginx
    envFrom:
      - configMapKeyRef:
          name: app-config
Use envFrom to define all of the ConfigMap's data as container environment variables. The key from the ConfigMap becomes the environment variable name in the Pod.
- Mounting the configMap through the
Volumes. To consume a ConfigMap in a volume in a Pod:
- Create a ConfigMap or use an existing one. Multiple Pods can reference the same ConfigMap.
- Modify your Pod definition to add a volume under
.spec.volumes[]. Name the volume anything, and have a.spec.volumes[].configMap.namefield set to reference your ConfigMap object. - Add a
.spec.containers[].volumeMounts[]to each container that needs the ConfigMap. Specify.spec.containers[].volumeMounts[].readOnly = trueand.spec.containers[].volumeMounts[].mountPathto an unused directory name where you would like the ConfigMap to appear inside the container.- If there are multiple containers in the Pod, then each container needs its own
volumeMountsblock, but only one.spec.volumesis needed per ConfigMap
- If there are multiple containers in the Pod, then each container needs its own
- Modify your image or command line so that the program looks for files in that directory. Each key in the ConfigMap data map becomes the filename under mountPath.
- These volumes can be of various types, such as
emptyDir,hostPath,persistentVolumeClaim,configMap, orsecret. - The
volumeMountssection allows you to connect the volumes defined in the Pod specification to specific paths within the container's filesystem - This enables containers to access and store data persistently, share data between containers in the same Pod, or access configuration files and secrets securely.
- Mounted ConfigMaps are updated automatically
apiVersion: v1
kind: Pod
metadata:
  name: mypod
spec:
  containers:
  - name: mypod
    image: redis
    volumeMounts:
    - name: foo
      mountPath: "/etc/foo"
      readOnly: true
  volumes:
  - name: foo
    configMap:
name: myconfigmap- A Secret is an object that contains a small amount of sensitive data such as a password, a token, or a key.
- Using a Secret means that you don't need to include confidential data in your application code.
- Secrets are similar to ConfigMaps but are specifically intended to hold confidential data.
- A secret is only sent to a node if a pod on that node requires it.
- Kubelet stores the secret into a
tmpfsso that the secret is not written to disk storage. - Once the Pod that depends on the secret is deleted, kubelet will delete its local copy of the secret data as well.
- Set environment variables for a container.
- Provide credentials such as SSH keys or passwords to Pods.
- Allow the kubelet to pull container images from private registries.
- Imperative
- commands
- kubectl create secret generic
secret-name--from-literal=key=value - kubectl create secret generic
secret-name--from-literal=key=value--from-literal=key1=value1 - kubectl create secret generic
secret-name--from-file=path-to-file - kubectl create secret generic
app-secret--from-file=app-secret.properties
- kubectl create secret generic
- commands
- Diclarative
apiVersion: v1
kind: Secret
metadata:
  name: dotfile-secret
data:
  DB_HOST: dmFsdWUtMg0KDQo= # this is a encoded value
  DB_USER: dmFsdWUtMQ0KDQo= # this is a encoded value
  DB_PASS: dmFsdWUtMl0KDQo= # this is a encoded value
To encode a values in a secret use:
echo -n 'my-value-to-be-encoded' | base64
to decode the values in a secret use:
echo -n 'c29tZS12YWx1ZQ==' | base64 --decode
envFrominjecting secret as a Environment variables
---
apiVersion: v1
kind: Pod
metadata:
  name: secret-dotfiles-pod
spec:
  containers:
    - name: dotfile-test-container
      image: registry.k8s.io/busybox
      envFrom:
        - secretRef:
name: dotfile-secretvalueFrominjecting secret as aSingleEnvironment variables
---
apiVersion: v1
kind: Pod
metadata:
  name: secret-dotfiles-pod
spec:
  containers:
    - name: dotfile-test-container
      image: registry.k8s.io/busybox
      env:
        - name: SECRET_USERNAME
          valueFrom:
            secretKeyRef:
              name: dotfile-secret
key: username- Mount secret from a
volume
---
apiVersion: v1
kind: Pod
metadata:
  name: secret-dotfiles-pod
spec:
  containers:
    - name: dotfile-test-container
      image: registry.k8s.io/busybox
      volumeMounts:
        - name: secret-volume
          readOnly: true
          mountPath: "/etc/secret-volume"
  volumes:
    - name: secret-volume
      secret:
secretName: dotfile-secretNotes:
- Secrets are not encrypted they only encoded.
- dont push secrets to code repos
- secrets are not encrypted in `etcd
- enable the encryption at REST
- Anyone able to create pods/deploys in the same namespace can access the secrets
- configure less privileged access to secrets -
RBAC- Consider third party secrets providers
- AWS provider
- AZURE provider
- GCP provider
- valut provider
- The containers in a Pod are automatically co-located and co-scheduled on the same physical or virtual machine in the cluster.
- The containers can share resources and dependencies, communicate with one another, and coordinate when and how they are terminated.
- SIDECAR
- ADAPTER
- AMBASSADOR

- Pods that run a single container.
- The "one-container-per-Pod" model is the most common Kubernetes use case; in this case, you can think of a Pod as a wrapper around a single container; Kubernetes manages Pods rather than managing the containers directly.
- Pods that run multiple containers that need to work together.
- A Pod can encapsulate an application composed of multiple co-located containers that are tightly coupled and need to share resources. These co-located containers form a single cohesive unit of service—for example, one container serving data stored in a shared volume to the public, while a separate sidecar container refreshes or updates those files. The Pod wraps these containers, storage resources, and an ephemeral network identity together as a single unit.
- Init containers can contain utilities or setup scripts not present in an app image.
- You can specify init containers in the Pod specification alongside the containers array (which describes app containers).
- containers that run to completion during Pod initialization.
- init containers, which are run before the app containers are started.
- If a Pod's init container
fails, thekubeletrepeatedly restarts that init container until it succeeds. - However, if the Pod has a
restartPolicyofNever, and an init container fails during startup of that Pod, Kubernetes treats the overall Pod as failed. - But at times you may want to run a process that runs to completion in a container.
For example a process that pulls a code or binary from a repository that will be used by the main web application. That is a task that will be run only one time when the pod is first created. Or a process that waits for an external service or database to be up before the actual application starts. That's where initContainers comes in.
Example 1:
    apiVersion: v1
    kind: Pod
    metadata:
      name: myapp-pod
      labels:
        app: myapp
    spec:
      containers:
      - name: myapp-container
        image: busybox:1.28
        command: ['sh', '-c', 'echo The app is running! && sleep 3600']
      initContainers:
      - name: init-myservice
        image: busybox
        command: ['sh', '-c', 'git clone <some-repository-that-will-be-used-by-application> ; done;']
Init containers are exactly like regular containers, except:
- Init containers always run to completion.
- Each init container must
complete successfullybefore the next one starts.
- Init containers support all the fields and features of app containers, including resource limits, volumes, and security settings
- the resource requests and limits for an init container are handled differently
- Regular init containers (in other words: excluding sidecar containers) do not support the lifecycle, livenessProbe, readinessProbe, or startupProbe fields.
Init container
-
They run to completion before any application containers start within a pod.
-
Their primary role is to set up the correct environment for the app to run.
-
This may involve tasks like database migrations, configuration file creation, or permission setting.
-
Once an init container has successfully completed its task, the app containers in the pod can start.
-
init containers do not support lifecycle, livenessProbe, readinessProbe, or startupProbe
-
Init containers share the same resources (CPU, memory, network) with the main application containers
Sidecar
-
They run alongside the main application container, providing additional capabilities like logging, monitoring, or data synchronization.
-
Unlike init containers, sidecar containers remain running for the life of the pod.
-
They are used to enhance or extend the functionality of the primary app container without altering the primary application code.
-
For example, a logging sidecar might collect logs from the main container and forward them to a central log store.
-
whereas sidecar containers support all these probes to control their lifecycle.
- If you specify multiple init containers for a Pod, kubelet runs each init container sequentially
- Each init container must succeed before the next can run.
- When all of the init containers have run to completion,
kubeletinitializes the application containers for the Pod and runs them as usual. - If any of the initContainers fail to complete, Kubernetes restarts the Pod repeatedly until the Init Container succeeds.
- if the pod fails to restart after sevral attemps then K8s gives up and pod goes into
crashloopbackofferror.
Example 2:
    apiVersion: v1
    kind: Pod
    metadata:
      name: myapp-pod
      labels:
        app: myapp
    spec:
      containers:
      - name: myapp-container
        image: busybox:1.28
        command: ['sh', '-c', 'echo The app is running! && sleep 3600']
      initContainers:
      - name: init-myservice
        image: busybox:1.28
        command: ['sh', '-c', 'until nslookup myservice; do echo waiting for myservice; sleep 2; done;']
      - name: init-mydb
        image: busybox:1.28
        command: ['sh', '-c', 'until nslookup mydb; do echo waiting for mydb; sleep 2; done;']
NAME READY STATUS RESTARTS AGE
myapp-pod 0/1 Init:0/2 0 6m
- We can drain the node on K8s cluster for which we want to patch
- this will make the node unschedulable and whatever pods present on the node will be terminated and created on some other node which part of the replica set.
- if the pods on the node which is supposed tobe drain is not a part of replicaset of replication controller or deamonSet then that node will note be able to drain because that pod will not created on other node. So for this we need to use the
--forceoption.
Command
kubectl drain `node_name`
kubectl drain controlplane --ignore-daemonsets
kubectl drain controlplane --force --ignore-daemonsets # when the pod is present and not a part of replicaSet
- with drain you can empty node and make the node unschedulable
- after the pathing is done you can make the node normal by making it uncorden.
Command
kubectl uncordon `node_name`
- this will make the node schedulable. and the new pods will be spawned when the pods on the other node will be terminated or crashed.
Command
kubectl cordon 'node_name'
- This will cordon the node means this make the node unshedulable, But the pods which are already presnet on the node will not be evicted.
- Taints offer more granular control compared to cordoning
- always the
kube-apiserverwill be one or two versions higher than other cluster components - but the
kubectlcan be higher thankube-apiserver 
- whenever the new version of k8s is releases then the
X-3version will be unsupported. - recommended way of upgrading is upgrading minor versios
- ex -
1.10 --> 1.11 --> 1.12 --> 1.13
- ex -
- you can easily upgrade the k8s version on managed k8s on cloud provider with just few clicks
- for
kubeadmyou can use thekubeadm upgrade plankubeadm upgrade apply- in kubeadm upgrade the kublets are not upgraded you have to manually upgrade the kubelets
- when you do
kubectl get nodeit will only shows the versions of the kubelet on the master and worker nodes
- if you have deployed the k8s cluster from scratch then you need to upgrade each compomnents manually.

- Strategy-1
- upgrade the mastet node first this will not give downtime as the pods in the nodes are still serving the traffic
- as the master is still upgrading the new pods on the Worker nodes will not be created as a part of
replicaSet
- as the master is still upgrading the new pods on the Worker nodes will not be created as a part of
- upgrading all node at once this will have a downtime
- upgrade the mastet node first this will not give downtime as the pods in the nodes are still serving the traffic
- Strategy-2
- Upgarding the master node fist this will not give downtime as the pods in the nodes are still serving the traffic
- as the master is still upgrading the new pods on the Worker nodes will not be created as a part of
replicaSet
- as the master is still upgrading the new pods on the Worker nodes will not be created as a part of
- Upgarding the node one by one, when a node is been taken down for upgrade the pods on the node will be creted on the different node which is running.

- Upgarding the master node fist this will not give downtime as the pods in the nodes are still serving the traffic
- Strategy-3
- Upgrade the Master first
- add new updated versions nodes (i.e 1.11v)
- remove the old versioned nodes (i.e 1.10v) and the pods on them will be trasfered to the new nodes (i.e 1.11v)


- etcd is the key-value store for kubernetes cluster
- There are two way you can backup the cluster configurations
- querying the
kube-apiserver - taking a snapshot.db of
etcd
- querying the
- You cannot backup the etcd in managed K8s cluster
etcdstores the state of the cluster- rather than taking a backup of each individual resource, best way to take the backup of
ETCD database - for etcd the data is stored in the
data-dir=/var/lib/etcd - etcd comes with a built in snapshot solution
- to take the
etcdbackup first stop the kube-apiserver usingService kube-apiserver stopped
ETCDCTL_API=3 etcdctl \
    snapshot save snapshot.db
- to check the snapshot status
ETCDCTL_API=3 etcdctl \
    snapshot status snapshot.db
ETCDCTL_API=3 etcdctl \
    snapshot restore snapshot.db \
        --data-dir /var/lib/etcd-from-backup
systemctl daemon-reloadservice etcd restart- for authentication remember to provide the certs for
etcd
ETCDCTL_API=3 etcdctl --endpoints=https://[127.0.0.1]:2379 \
--cacert=/etc/kubernetes/pki/etcd/ca.crt \
--cert=/etc/kubernetes/pki/etcd/server.crt \
--key=/etc/kubernetes/pki/etcd/server.key \
snapshot save /opt/snapshot-pre-boot.db
- if are using a managed k8s you wont be able to access or backup the
etcd - best way to query the
api-server - to query the
api-serveruse the below command
kubectl get all --all-namespaces -o yaml > all-deploy-services.yml
etcdctlis a command-line tool for interacting with etcd, a distributed key-value store.etcdctlis used to:- Put, get, and delete keys from etcd
- Watch for changes to keys
- Manage etcd cluster membership
- Perform maintenance tasks, such as defragmentation and compaction
etcdctl put <key> <value>
etcdctl get <key>
etcdctl del <key>
# Watches for changes to a key in etcd and prints the new value when it changes.
etcdctl watch <key>
# Manages etcd cluster membership
etcdctl member <subcommand>
- controlling the access to
kube-apiserveryou can control the authentication- who can acess and what can they do
Who can access?
Authentication mechanism
- Username and passwords in a file
- Username and Token in a file
- Certificates
- LDAP
- Service Accounts
Authorization in K8s
- RBAC Authorization (Role based access control)
- ABAC Authorization (Attibute based access control)
- Node Authorization
- Webhook Mode
All communication between varius master components are secure using the TLS certificate

you can restricthe the communication between pods with network policies
Youtube Vedio for Refrence Readme.md
-
To Create a user in Kubernetes you need to create a
User.crtandUser.keyand add it in the KubernetesKubeconfigfile -
User.crtfile must be signed by KubernetesCA authority. -
User access the k8s cluster:
- Admins
- Developers
- End users
- bots
-
K8s connot manage the Users natively
- hence you cannot create or list user in k8s
-
k8s relies on external user managment service like
LDAP -
you can only manage the k8s service account
-
all user access is managed by the
kube-apiserver -

-
Auth Mechanisam for
kube-apiserver-
Username and passwords in a csv file
password123,username1,user_id1 password456,username2,user_id2 password789,username3,user_id3- `--basic-auth-file=user-details.csv`
-
-
Username and Token in a csv file
-
Certificates
-
LDAP
-
Service Accounts


Communication between Pods:
Podsare isolated from each other- by default pod on any node can talk with any pod within a cluster.
- you can restrict this by setting up a network policy.
- TLS Certificationis a cryptographic protocol designed to provide secure communication over a computer network. It ensures data privacy, integrity, and authentication between clients and servers.
- with the help of
httpsthere is no intervention between sender and recevier. httpsis an extension ofhttpRSAis no longer support as a method for key exchange, it is replaced by Diffie-Hellman algorithm for more secure key exchange method.
- Handshake Process:
TLS Handshake- Client Hello: The client sends a "Client Hello" message to the server, which includes the TLS version, cipher suites, and a randomly generated number.
- Server Hello: The server responds with a "Server Hello" message, selecting the TLS version and cipher suite from the client's list, and provides a randomly generated number.
- Server Authentication and Pre-Master Secret:
- Server Certificate: The server sends its digital certificate to the client, which includes the server’s public key and is issued by a trusted
Certificate Authority (CA). - Pre-Master Secret: The client generates a pre-master secret encryption session key, encrypts it with the server’s public key, and sends it to the server.
- Server Certificate: The server sends its digital certificate to the client, which includes the server’s public key and is issued by a trusted
- Session Keys Creation:
- Both the client and the server use the
pre-master secretalong with the previously exchanged random numbers to generate the same session keys, which are symmetric keys used for the session’s encryption and decryption.
- Both the client and the server use the
- Secure Communication:
- Change Cipher Spec: Both client and server send a message to indicate that future messages will be encrypted using the session keys.
- Encrypted Messages: The client and server communicate securely using symmetric encryption.


The combination of TLS and Asystemtec provides a
robustsecurity framework, where TLS secures the communication channel and Asystemtec verifies user identities and manages sessions.
-
Symmentric Encryption
- it is a secure way of encryption
- In symmetric key encryption, the same key is used for both encryption and decryption of data.
- encrypted data and key travells through same network
- hacker can intersept that key while sending and decrypt it.
- faster way of authentication
-
Asymmtric Encryption
- Asymmetric encryption uses two mathematically connected keys: a public key and a private key.
ssh-keygento generate the private and public keys
- The public key is used for encryption of user data, while the private key is used for decryption of user data of the same server itself.
- Server send the public key to client
- client uses the public key to encrypt the private key of client
- client sends the encrypted private key to server
- server decrypts the encrypted key with its private key
- client encrypts the data with the clients public key
- client sends the encrypted data to server
- server decrypts the data with the clients private key which server recived earlier.
- Reads the data.
- Hacker can place its own proxy server in place of actual server
- then client communicates with that hacker server and hacks the data.s
- Asymmetric encryption uses two mathematically connected keys: a public key and a private key.
-
TLS Handshake
SSL/TLScerts are created by CA authorities.- Application server sends its public key to CA authority.
- CA authority issues a TLS certificate
- CA authority enclose the application server key init and give signature with CA authority server public key.
SIGNATURE = Application server public key + CA authority server public key- signature is then added in the certificate.
- Now that certificate from CA will be transfered to the application server with application server public key init.
- now the application server sends that signed certificate to the client server
- client server then recives the certificate from application server with application server public key init
- client server then goes to the CA authority of the application server and brings its public key.
- client then verify the SIGNATURE with public key if application server and Public key of CA authority.
- if the SIGNATURE matches then Client establish the connection with that application server, if not then connection is not been established.
- client uses that public key to encrypt the private key of client
- client send that encrypted private key of the client server to application server which was been encrypted by the public key of the application server.
- application server then drypt that client private key with application server private key, and stores that Client private key for that session.
- client encrypts the data with its public key and send to the application server
- application server recives that ecrypted data and drypt it with clients private key and reads the data.

- TLS certificates are used to establish secure connection between the Master Node and Workers nodes or a System Admins is accessing the
kube-apiserverwith the help ofKubectl. - kube-apiserver is itself act as server so need to be secure with
httpsconnection by the help ofTLS certificateso it has its ownapiserver.crtandapiserver.key. - similarly
etcd-serveralso hasetcdserver.crtandetcdserver.key. - Admin also requires the
admin.crtandadmin.keyto access thekube-apiserver. - similarly the
kube-scheduleralso talks with thekube-apiserverto schedule the pods on the worker nodes. So it also requires the TLS certificate and the keyscheduler.crtandscheduler.key - Even the Kube-apiserver requires the
apiserver.crtandapiserver.keyto talk toetcd-server

- Cluster Certificates
- Generate the Private Key
- command =
openssl genrsa -out ca.key 2048
- command =
- Generate the Certificate Signing Request (CSR)
- command =
openssl req -new -key ca.key -subj "/CN=KUBERNETES-CA" -out ca.csr
- command =
- Sign Certificates - command =
openssl x509 -req -in ca.csr -signkey ca.key -out ca.crt-ca.csris the cert with no sign -ca.keyis used to sign the cert
- Generate the Private Key
- Client Certificates
- Generate the Private Key
- command =
openssl genrsa -out admin.key 2048
- command =
- Generate the Certificate Signing Request (CSR)
- command =
openssl req -new -key admin.key -subj "/CN=KUBE-admin" -out admin.csr
- command =
- Sign Certificates
- command =
openssl x509 -req -in admin.csr -signkey admin.key -out admin.crt admin.csris the cert with no signadmin.keyis used to sign the certadmin.crtis the final signed certificate
- command =
- Generate the Private Key

To view all the certificates
cat /etc/kubernetes/manifests/apiserver.yaml
- To configure the user with the kubeAPI server you need to use the KubeAPI server.
- Kubeconfig is a configuration file that contains the information about the cluster, user and the authentication information (contexts).
- It is located inside the
~/.kube/config
Clusters
- Clusters have information about the different environments.
- Development
- UAT
- Production
Users
- Users have information about the different users.
- Which user has access to the which cluster
- Admin user
- Dev user
- Prod user
- These user may have different privileges to different cluster.
Creating User in Kubernetes
- Kubernetes does not have a concept of users, instead it relies on certificates and would only trust certificates signed by its own CA.
- To get the CA certificates for our cluster, easiest way is to access the master node.
- Because we run on kind, our master node is a docker container.
- The CA certificates exists in the
/etc/kubernetes/pkifolder by default.
docker exec -it rbac-control-plane bash

ls -l /etc/kubernetes/pki
total 60
-rw-r--r-- 1 root root 1135 Sep 10 01:38 apiserver-etcd-client.crt
-rw------- 1 root root 1675 Sep 10 01:38 apiserver-etcd-client.key
-rw-r--r-- 1 root root 1143 Sep 10 01:38 apiserver-kubelet-client.crt
-rw------- 1 root root 1679 Sep 10 01:38 apiserver-kubelet-client.key
-rw-r--r-- 1 root root 1306 Sep 10 01:38 apiserver.crt
-rw------- 1 root root 1675 Sep 10 01:38 apiserver.key
-rw-r--r-- 1 root root 1066 Sep 10 01:38 ca.crt
-rw------- 1 root root 1675 Sep 10 01:38 ca.key
drwxr-xr-x 2 root root 4096 Sep 10 01:38 etcd
-rw-r--r-- 1 root root 1078 Sep 10 01:38 front-proxy-ca.crt
-rw------- 1 root root 1679 Sep 10 01:38 front-proxy-ca.key
-rw-r--r-- 1 root root 1103 Sep 10 01:38 front-proxy-client.crt
-rw------- 1 root root 1675 Sep 10 01:38 front-proxy-client.key
-rw------- 1 root root 1679 Sep 10 01:38 sa.key
-rw------- 1 root root  451 Sep 10 01:38 sa.pub

exit the container
cd kubernetes/rbac
docker cp rbac-control-plane:/etc/kubernetes/pki/ca.crt ca.crt
docker cp rbac-control-plane:/etc/kubernetes/pki/ca.key ca.key
-
As mentioned before, Kubernetes has no concept of users, it trusts certificates that is signed by its CA. This allows a lot of flexibility as Kubernetes lets you bring your own auth mechanisms, such as OpenID Connect or OAuth.
-
First thing we need to do is create a certificate signed by our Kubernetes CA.
-
Easy way to create a cert is use openssl and the easiest way to get openssl is to simply run a container:
docker run -it -v ${PWD}:/work -w /work -v ${HOME}:/root/ --net host alpine sh apk add openssl -
Let's create a certificate for
Bob Smith:#start with a private key openssl genrsa -out bob.key 2048Now we have a key, we need a certificate signing request (CSR). We also need to specify the groups that Bob belongs to. Let's pretend Bob is part of the Shopping team and will be developing applications for the Shopping
openssl req -new -key bob.key -out bob.csr -subj "/CN=Bob Smith/O=Shopping"
Use the CA to generate our certificate by signing our CSR. We may set an expiry on our certificate as well
openssl x509 -req -in bob.csr -CA ca.crt -CAkey ca.key -CAcreateserial -out bob.crt -days 1
Building a kube config Let's install kubectl in our container to make things easier:
apk add curl nano
curl -LO https://storage.googleapis.com/kubernetes-release/release/`curl -s https://storage.googleapis.com/kubernetes-release/release/stable.txt`/bin/linux/amd64/kubectl
chmod +x ./kubectl
mv ./kubectl /usr/local/bin/kubectl
We'll be trying to avoid messing with our current kubernetes config. So lets tell kubectl to look at a new config that does not yet exists
export KUBECONFIG=~/.kube/new-config
Create a cluster entry which points to the cluster and contains the details of the CA certificate:
kubectl config set-cluster dev-cluster --server=https://127.0.0.1:52807 \
--certificate-authority=ca.crt \
--embed-certs=true

#see changes
nano ~/.kube/new-config
kubectl config set-credentials bob --client-certificate=bob.crt --client-key=bob.key --embed-certs=true\
kubectl config set-context dev --cluster=dev-cluster --namespace=shopping --user=bob
kubectl config use-context dev
Contexts
- Contexts are use to link the user and cluster together.
- It is used to switch between different cluster and user.
- For example, you can have a context for the development cluster and another for the production cluster
- use need to set the current context in the config file which tells the kubectl to which user to user for which cluster.
- you can also set the working namespace for a context
To view the Kubeconfig
- To view the config file
kubectl config view
- To use a custom config file
kubectl config view --kubeconfig=my-custom-config
- To change the current context
kubectl config use-context <user@cluster>
- To see only the configuration information associated with the current context, use the
--minifyflag.kubectl config --kubeconfig=config-demo view --minify
Example config file
apiVersion: v1
kind: Config
current-context: user@cluster

clusters:
- name: development
  cluster:
      certificate-authority: ca.crt
      # to add ca.crt file content in base64 encoded format directly in config file
      # certificate-authority-data:
      server: 0.0.0.0
- name: test
  cluster:
      certificate-authority: ca.crt
      server: 0.0.0.0

users:
- name: developer
  user:
      client-certificate: admin.crt
      client-key: admin.key
- name: experimenter
  user:
      client-certificate; admin.crt
      client-key: admin.key

contexts:
- name: developer@development
  context:
      cluster: development
      user: developer
      namespace: frontend
- name: experimenter@test
  context:
      cluster: test
      user: experimenter
      namespace: storage
Add context details to your configuration file:
kubectl config --kubeconfig=config-demo set-context dev-frontend --cluster=development --namespace=frontend --user=developer
kubectl config --kubeconfig=config-demo set-context dev-storage --cluster=development --namespace=storage --user=developer
kubectl config --kubeconfig=config-demo set-context exp-test --cluster=test --namespace=default --user=experimenter
Note: A file that is used to configure access to a cluster is sometimes called a kubeconfig file. This is a generic way of referring to configuration files. It does not mean that there is a file named
kubeconfig.
Set the KUBECONFIG environment variable
- Linux
export KUBECONFIG_SAVED="$KUBECONFIG"
- Append $HOME/.kube/config to your KUBECONFIG environment variable
export KUBECONFIG="${KUBECONFIG}:${HOME}/.kube/config"
- Windows PowerShell
$Env:KUBECONFIG_SAVED=$ENV:KUBECONFIG$Env:KUBECONFIG="$Env:KUBECONFIG;$HOME\.kube\config"
- In Kubernetes, API groups are a way to organize different kinds of API resources, helping to make the API more modular and scalable. This approach allows the introduction of new APIs and versions without disturbing the core API, improving Kubernetes' extensibility. API groups essentially group related resources and provide versioning for these resources
Structure of API Groups:
/apis/{group}/{version}/{resource}
for Example:
/apis/apps/v1/deployments
appsis the API group.v1is the API version.deploymentsis the resource being accessed.
- Core Group (Legacy or No Group) (api)
- Also known as the core or legacy API, this group doesn't have a name in the URL.
- The resources here are some of the core Kubernetes components, like Pods, Services, Namespaces, and Nodes.
/api/v1/pods
- Named Groups (apis)
-
These are groups with names and are organized based on the functionality they serve.
-
Each named group can have different versions (e.g.,
v1,v2beta, etc.), allowing backward compatibility and smooth transitions to newer versions. -
Examples:
-
apps: This API group contains resources like Deployments, DaemonSets, and StatefulSets./apis/apps/v1/deployments
-
batch: Handles jobs and cron jobs./apis/batch/v1/jobs
-
networking.k8s.io: Deals with network-related resources like Ingress and NetworkPolicies./apis/networking.k8s.io/v1/ingresses
-
rbac.authorization.k8s.io: Manages Role-Based Access Control (RBAC) resources like Roles and RoleBindings./apis/rbac.authorization.k8s.io/v1/roles
- Custom Resource Definitions (CRDs)
- Kubernetes allows users to define their own APIs by creating
Custom Resource Definitions(CRDs), which belong to custom groups and provide an extension to Kubernetes' built-in functionality. - CRDs can be used to define resources in an organization-specific group.
/apis/custom.group/v1/myresource
Versioning in API Groups
Kubernetes API groups use versioning (e.g., v1, v2beta1) to ensure backward compatibility. Alpha versions (v1alpha1) are experimental and may change. Beta versions (v1beta1) are more stable but can still undergo changes. Stable versions (v1) are generally considered safe for production use.
Summary of API Group Types:
Core Group: No named group.
Named Groups: Feature-specific groups like apps, batch, networking.k8s.io, etc.
Custom Groups (CRDs): User-defined API groups for extending Kubernetes functionality.
- Kubernetes authorization takes place following authentication. Usually, a client making a request must be authenticated (logged in) before its request can be allowed; however, Kubernetes also allows anonymous requests in some circumstances.
- All parts of an API request must be allowed by some
authorization mechanismin order to proceed. In other words: access is denied by default.
- RBAC
- ABAC
- Webhook
- Node

- RBAC is the default authorization mode in Kubernetes.
- It is based on the concept of roles and bindings.
- Roles are collections of permissions.
- Bindings are used to assign roles to users or groups.
- in RBAC permissions are not assign directly to the user or group.
RoleandRoleBindingare namespace specific.- A Role always sets permissions within a particular namespace; when you create a Role, you have to specify the namespace it belongs in.
- for cluster level you need to use the
ClusterRoleandClusterRoleBindingwhich covers all namespaces. - to check which Authorization modes are enabled on the cluster you can use the
kubectl describe pod kube-apiserver-controlplane -n kube-system | grep "--authorization-mode"
- Define a
generic containerfor permissions : aRole. - Assign the
permissionsto theRole. - Bind the
Roleto theUserandGroup.

Example:
apiVersion: rbac.authorization.k8s.io/v1
kind: Role
metadata:
  namespace: default
  name: pod-reader
rules:
- apiGroups: [""] # "" indicates the core API group
  resources: ["pods"]
  verbs: ["get", "watch", "list"]
To link the User to the Role we need to use the RoleBinding.
apiVersion: rbac.authorization.k8s.io/v1
# This role binding allows "jane" to read pods in the "default" namespace.
# You need to already have a Role named "pod-reader" in that namespace.
kind: RoleBinding
metadata:
  name: read-pods
  namespace: default
subjects:
# You can specify more than one "subject"
- kind: User
  name: jane # "name" is case sensitive
  apiGroup: rbac.authorization.k8s.io
roleRef:
  # "roleRef" specifies the binding to a Role / ClusterRole
  kind: Role #this must be Role or ClusterRole
  name: pod-reader # this must match the name of the Role or ClusterRole you wish to bind to
apiGroup: rbac.authorization.k8s.io- RoleBinding also operates on the
namespacelevel.
commands
kubectl get rolesto list all roles in the current namespacekubectl get rolebindingskubectl describe role <role_name>
Check acess
To see if the use has the access to a perticuler resource in the cluster
- kubectl auth
can-icreate deployment ----> yes - kubectl auth
can-idelete nodes ------> no - kubectl auth
can-icreate deployment --asdev-user----> no - kubectl auth
can-icreate pods --asdev-user-----> yes - kubectl auth
can-icreate pods --asdev-user--namespace test ----> no
ClusterRoleandClusterRoleBindingsare used to manage access at the cluster level. They are similar toRoleandRoleBindings.- with the help of CLusterRole the
usercan access theresourcesof other namespaces too. - Use-cases
- Node
- delete Node
- Create Node
- update Node
- Storage
- delete PV
- Create PV
- update PV
- Node
Namespaced Resources
- Role
- RoleBindings
- Deployments
- Pods
- ReplicaSets
- ConfigMaps
- Secretes
- Services
- PVC
- Jobs
Cluster Scoped Resources
- ClusterRole
- ClusterRoleBindings
- PV
- nodes
- CertificateSingningRequests
- namespaces
apiVersion: rbac.authorization.k8s.io/v1
kind: ClusterRole
metadata:
  # "namespace" omitted since ClusterRoles are not namespaced
  name: secret-reader
rules:
- apiGroups: [""]
  #
  # at the HTTP level, the name of the resource for accessing Secret
  # objects is "secrets"
  resources: ["secrets"]
verbs: ["get", "watch", "list"]apiVersion: rbac.authorization.k8s.io/v1
# This cluster role binding allows anyone in the "manager" group to read secrets in any namespace.
kind: ClusterRoleBinding
metadata:
name: read-secrets-global
subjects:
- kind: Group
name: manager # Name is case sensitive
apiGroup: rbac.authorization.k8s.io
roleRef:
kind: ClusterRole
name: secret-reader
apiGroup: rbac.authorization.k8s.io- ServiceAccount is used when an application want to connect or retrieve data from the cluster
- Authenticating to the API server or implementing identity-based security policies.
- There are two types of accounts in k8s:
- User Account
- used by users
- admin access the cluster to administer the cluster
- developer access the cluster to deploy the application
- By default, user accounts don't exist in the Kubernetes API server; instead, the API server treats user identities as
opaquedata.
- Service Accounts
- Used by machines
- User Account
- When a service account is created it two objects.
- the Service Account object
kubectl describe serviceaccount <name>
- Secret object to store the token init.
kubectl describe secret <token_name>
- the Service Account object
- Then the Secret object is linked to the service account
- Process
- Create a SA
kubectl create sa <SA_name> - Export the token
kubectl create token <SA_name>- Token path:
/var/run/secrets/kubernetes.io/serviceaccount
- Token path:
- Assign right permissions with (RBAC)
- Create Role
- Create RoleBindings
- Attach the
SAtoPODusingserviceAccountNamefield - for checking permissions use below command
kubectl auth can-i get pod --as=system:serviceaccount:default:<SA_name>
- Create a SA
- Each
NameSpacehas its own defaultservice account - When you create a cluster, Kubernetes automatically creates a ServiceAccount object named
defaultfor every namespace in your cluster. it hasno permissionby default - whenever a new pod is created the default
service Accountand its token automatically gets mounted as a volume inside the pod - if you don't mention the
service Accountname a default gets automatically mounted as a volume mount inside the pod - To prevent Kubernetes from automatically injecting credentials for a specified ServiceAccount or the
defaultServiceAccount, set theautomountServiceAccountTokenfield in your Pod specification tofalse.Note: After Kubernetes version
1.24the token has expiration time
apiVersion: v1
kind: ServiceAccount
metadata:
  annotations:
    kubernetes.io/enforce-mountable-secrets: "true"
  name: my-serviceaccount
namespace: my-namespaceapiVersion: rbac.authorization.k8s.io/v1
kind: Role
metadata:
namespace: default
name: pod-reader-SA
rules:
- apiGroups: [""] # "" indicates the core API group
resources: ["pods"]
verbs: ["get", "watch", "list"apiVersion: rbac.authorization.k8s.io/v1
kind: RoleBinding
metadata:
name: read-pods
namespace: default
subjects:
- kind: ServiceAccount
name: my-serviceaccount
namespace: default
roleRef:
kind: Role
name: pod-reader-SA
apiGroup: rbac.authorization.k8s.io---
apiVersion: v1
kind: Pod
metadata:
name: frontend
spec:
serviceAccountName: my-serviceaccount
containers:
- name: nginx
image: nginx
command: ["sleep", "5000"]To remove the default SA from pod
---
apiVersion: v1
kind: Pod
metadata:
  name: frontend
spec:
  automountServiceAccountToken: false # To do not use the default SA
  containers:
  - name: nginx
    image: nginx
command: ["sleep", "5000"]- to connect to private container registry other than docker
- image:
registry_url/user_Account/Image_repo - to authenticate to the private docker register you need to create a secret

kubectl create secret docker-registry docker-creds \
--docker-server= private-registry.io \
--docker-username= registry-user \
--docker-password= registry-password \
--docker-email= registry-user@org.com
apiVersion: v1
kind: Secret
metadata:
  name: docker-registry
type: kubernetes.io/dockerconfigjson
data:
  docker-server: gcr.io
  docker-username: xyz
  docker-password: password
docker-email: xyz@mail.com- Attach the
secretto thepodwithimagePullSecretsfield in pod definition
---
apiVersion: v1
kind: Pod
metadata:
  name: frontend
spec:
  containers:
  - name: registry_url/user_Account/Image_repo # give full image Name
    image: nginx
    command: ["sleep", "5000"]
  imagePullSecrets:
- docker-registry- container and host share the same kernel
- All the process run by the container are ran on the host itself but in there own namespace
- Process of containers are isolated from each other
- by default the docker run process as a root user inside the container
- you can choose the
userwhile running the container ex-user 1000
- you can choose the
- use can build a
Dockerfilewithuser 1000then any process docker run inside the docker container will be run as auser 1000
FROM ubuntu
USER 1000
docker run my-ubuntu-image sleep 3600 # this will run the sleep command as a USER 1000 not the ROOT inside the container
ROOTuser within the container is not as good as theROOTuser in the host- Docker host doesn't have the privilege to reboot the host
docker run --cap-add MAC_ADMIN ubuntu: This option adds a specific capability to the container.MAC_ADMINstands for Mandatory Access Control (MAC) administration. This capability allows the container to modify or administer MAC policies. Such policies control access to system resources, enforcing security boundaries.- Note: Granting the
MAC_ADMINcapability should be done carefully, as it gives the container additional privileges, potentially increasing security risks.
docker run --cap-drop KILL ubuntu: This option removes a specific capability from the container.KILLcapability: Normally, this capability allows processes within the container to send signals to other processes (e.g., to terminate them). By dropping it, you prevent processes within the container from sending signals to terminate other processes (unless they own the processes).- Security Context: Dropping capabilities like
KILLis part of a security best practice called the "principle of least privilege." By reducing the container's privileges, you minimize the risk of it being used to compromise the system.
docker run --priviledge ubuntu: This flag grants the container almost all the host’s kernel capabilities. Specifically - The container has access to all devices on the host, allowing it to perform operations that are usually restricted. - The container can change certain settings and modify system configurations, which are typically protected (e.g., mount filesystems, change kernel parameters). - It bypasses many of Docker's usual isolation mechanisms, essentially giving the container root access to the host machine’s kernel and hardware.Note: Security Risk: Running a container with the
--privilegedflag is risky because it grants nearly unrestricted access to thehostsystem. This should only be used in trusted environments or when absolutely necessary, such as in cases requiring direct hardware access (e.g., for containers managing low-level system operations or running software that needs kernel-level permissions).
- To Implement the docker like capabilities via k8s
- to apply at
podlevel addsecurityContextfield
---
apiVersion: v1
kind: Pod
metadata:
  name: frontend
spec:
  securityContext:
    runAsUser: 1000
  containers:
  - name: ubuntu_conatiner
    image: ubuntu
    command: ["sleep", "3600"]
To apply capabilities at container level inside the pod
---
apiVersion: v1
kind: Pod
metadata:
  name: frontend
spec:
  containers:
  - name: ubuntu_conatiner
    image: ubuntu
    command: ["sleep", "3600"]
    securityContext:
      runAsUser: 1000
      capabilities:
add: ["MAC_ADMIN"]Note: Capabilities cannot be added at the
PODlevel it can be only added at thecontainerlevel
apiVersion: v1
kind: Pod
metadata:
  name: multi-pod
spec:
  securityContext:
    runAsUser: 1001
  containers:
  -  image: ubuntu
     name: web
     command: ["sleep", "5000"] # This command will run as USER 1002
     securityContext:
      runAsUser: 1002

  -  image: ubuntu
     name: sidecar
command: ["sleep", "5000"] # This command will run as USER 1001- you can only use the
NetworkPolicyobject in k8s when you have deployed a Networking solution inside the cluster.- Antrea
- calico
- cilium
- kube-router
- Romana
- Weave-net
- Antrea
- If you want to control traffic flow at the IP address or port level (OSI layer 3 or 4), NetworkPolicies allow you to specify rules for traffic flow within your cluster, and also between Pods and the outside world.
- Your cluster must use a network plugin that supports
NetworkPolicyenforcement. - by default any pod in any node within cluster can communicates with any pod.
- With Network policies attached to a pod you can control the ingress(incomming) and egress(Outgoing) traffic from a pod. User Case
- Suppose we have a 3-tier application
- front-end
- back-end
- Database
- we want only back-end pod can communicates with the database pod, not the front-end pod
- we can achive this with the help of
Network policyobject in K8s.

FEATURES OF NETWORK POLICIES
- Namespaced resources: Network policies are defined as Kubernetes objects and are applied to a specific namespace. This allows you to control traffic flow between pods in different namespaces.
- Additive: In Kubernetes, network policies are additive. This means that if you create multiple policies that select the same pod, all the rules specified in each policy will be combined and applied to the pod.
- Label-based traffic selection: Kubernetes network policies allow you to select traffic based on pod labels. This provides a flexible way to control traffic flow within your cluster.
- Protocol and port selection: You can use network policies to specify which protocols (TCP-UDP-SCTP) and ports are allowed for incoming and outgoing traffic. This helps to ensure that only authorized traffic is allowed between pods.
- Integration with network plugins: Kubernetes network policies are implemented by network plugins. This allows you to use the network plugin of your choice and take advantage of its features and capabilities.

Create a pod database with labels
apiVersion: v1
kind: Pod
metadata:
  name: database-pod
  labels:
    app: database
spec:
  containers:
  -  image: mysql
     name: database-pod
command: ["sleep", "5000"]apiVersion: networking.k8s.io/v1
kind: NetworkPolicy
metadata:
name: database-pod-NP
spec:
podSelector:
matchLabels:
app: database
policyTypes:
- Ingress
ingress:
- from:
- podSelector:
matchLabels:
app: back-end
ports:
- protocol: TCP
port: 3306Now to enable the traffic from another namespace, below will allow traffic from back-end pod from prod namespace to database pod
apiVersion: networking.k8s.io/v1
kind: NetworkPolicy
metadata:
  name: database-pod-NP
spec:
  podSelector:
    matchLabels:
      app: database
  policyTypes:
    - Ingress
  ingress:
    - from:
        - podSelector:
            matchLabels:
              app: back-end
        - namespaceSelector:
            matchLabels:
              ns: prod
      ports:
        - protocol: TCP
          port: 3306
To control the outgoing traffic engress from the database pod to the back-end pod
apiVersion: networking.k8s.io/v1
kind: NetworkPolicy
metadata:
  name: database-pod-NP
spec:
  podSelector:
    matchLabels:
      app: database
  policyTypes:
    - Ingress
    - Egress
  ingress:
    - from:
        - podSelector:
            matchLabels:
              app: back-end
        - namespaceSelector:
            matchLabels:
              env: prod
      ports:
        - protocol: TCP
          port: 3306

  engress:
    - to:
        - podSelector:
            matchLabels:
              app: back-end
        - namespaceSelector:
            matchLabels:
              ns: prod
      ports:
        - protocol: TCP
          port: 3303
to add external server to connect to the database pod, then you need to allow that server IP
apiVersion: networking.k8s.io/v1
kind: NetworkPolicy
metadata:
  name: database-pod-NP
spec:
  podSelector:
    matchLabels:
      app: database
  policyTypes:
    - Ingress
    - Egress
  ingress:
    - from:
        - ipBlock:
            cidr: 172.17.0.0/16 # add range of Ip address
            except:
              - 172.17.1.0/24
      ports:
        - protocol: TCP
port: 6875With this tool, you don't have to make use of lengthy “kubectl config” commands to switch between contexts. This tool is particularly useful to switch context between clusters in a multi-cluster environment.
Installation:
sudo git clone https://github.com/ahmetb/kubectx /opt/kubectx
sudo ln -s /opt/kubectx/kubectx /usr/local/bin/kubectx
Syntax:
To list all contexts:
kubectx
To switch to a new context:
kubectx <context_name>
To switch back to previous context:
kubectx -
To see current context:
kubectx -c
This tool allows users to switch between namespaces quickly with a simple command.
Installation:
sudo git clone https://github.com/ahmetb/kubectx /opt/kubectx
sudo ln -s /opt/kubectx/kubens /usr/local/bin/kubens
Syntax:
To switch to a new namespace:
kubens <new_namespace>
To switch back to previous namespace:
kubens -
-
Docker File system in host:
- by default docker stores data in host at
- Images are stored in images folder
- container data is stored in container folder
- volumes in volumes folder
/var/lib/docker
    aufs
    containers
    image
    volumes
- each instruction in docker file has its own layer
- If the some of the layers is already used by the some other docker file previously then docker will not create the same layer again it will reuse it
- this will save Docker image build time
- this will save Docker image size
- Image layer
- This is a
readOnlylayer, where user cannot modify the containts of it. - if you want to modify let say application source code then docker will automatically creates the copy of it from the image layer to the container layer where you can be able to modify it.
- This is a
- Container layer
- This layer can be modify
read-writeby the user - container layer is temp layer and only created when the container is created and deleted when the container is bing deleted.
- This layer can be modify
- Once the image is created its layers are been shared by other images too.
- Once the container is deleted the data which is been changed also been deleted, to persists data we need to use the docker volmes.
- Volume Mount
- with volume mount you can mount the volume in host with inside the file directory in docker container
- Even if the container gets deleted the data still remains inside the volume in the host.
docker create volume volume1
docker run -v volume1:/app myimage
- Bind Mount
- Now suppose you want to mount a directory of host to the directory of container you can achive this with the help of Bind mount
docker run -v /temp/app:/app myimage
docker run --mount type=bind,source=/data/mysql,target=/var/lib/mysql mysql
- Now suppose you want to mount a directory of host to the directory of container you can achive this with the help of Bind mount
- Docker automatically choose the Storage drive based on OS.
- Docker supports multiple storage drivers
- AUFS
- ZFS
- BTRFS
- Device Mapper
- Overlay
- Overlay2
- Docker Volumes are used to persist data even after the container is deleted.
- You can use the Volume Drive to presist the data to AWS, GCP or Azure.
- local
- Azure file Storage
- Convoy
- Digital Ocean Block Storage
- NetApp
- etc.
docker run -it --name mysql --volume-driver rexray/ebs --mount src=ebs-vol,target=/var/lib/mysql mysql- this will provsion a AWS EBS to store the data from the Docker container volume to Cloud.
- CRI - Container Runtime Interface
- CNI - Container Network Interface
- CSI - Container Storage Interface
A Network Namespace is a Linux kernel feature that provides isolation of network resources between different processes. It allows multiple containers, applications, or processes to have separate network stacks, making it a key building block for containerized environments like Docker and Kubernetes.
When you create a network namespace:
- A new virtual network stack is created.
- The new namespace is isolated from the host and other namespaces.
- Virtual network interfaces (veth pairs) are often used to connect the namespace to the host or other namespaces.
-
Isolation:
- Each network namespace has its own network stack, including:
- Interfaces (e.g.,
eth0,lo) - Routing Tables
- Firewall Rules (iptables)
- Sockets
- Interfaces (e.g.,
- Each network namespace has its own network stack, including:
-
Multiple Instances:
- Multiple network namespaces can exist simultaneously on the same host.
- Each namespace can have different network configurations.
-
Default Namespace:
- By default, all processes and applications use the host's network namespace.
- When a new namespace is created, it starts empty, without any network interfaces.
-
Independence:
- Changes made in one namespace (e.g., adding routes or interfaces) do not affect others.
-
List Existing Namespaces:
ip netns list -
Create a New Namespace:
ip netns add my_namespace -
Run Commands in a Namespace:
ip netns exec my_namespace <command>
Example:
ip netns exec my_namespace ip a
-
Delete a Namespace:
ip netns delete my_namespace
- None
- Docker container inside the host connot talk to each other they are complely isolated from each other
- Host
- Docker container and host has no isolation, if the application running on port 80 for docker then it automatically run on port 80 of the host.
- overlay
- Overlay networks connect multiple Docker daemons together.
- ipvlan
- IPvlan networks provide full control over both IPv4 and IPv6 addressing.
- macvlan
- Assign a MAC address to a container.
- User-defined networks
- You can create custom, user-defined networks, and connect multiple containers to the same network. Once connected to a user-defined network, containers can communicate with each other using container IP addresses or container names.
- Bridge
- This is the default network in docker
- In terms of Docker, a bridge network uses a software bridge which lets containers connected to the same bridge network communicate, while providing isolation from containers that aren't connected to that bridge network.
- containers on different bridge networks can't communicate directly with each other.
- User-define bridge networks are
superiorto the defaultbridgenetwork.- User-defined bridges provide automatic DNS resolution between containers.
docker0on the host is the dockerbridgenetwork- Docker network is just a
network namespacebehind the scene - while doing the port fowarding in docker from host to container, docker creates the routing table behind the scene
iptables \
   -t nat \
   -A PREROUTING \
   -k DNAT \
   --dport 8080 \
--to-destination 80- CNI is a standard for networking in container orchestration systems like Kubernetes.
- The Container Networking Interface (CNI) is a specification and framework for configuring networking in containerized environments. It is widely used in container orchestration systems, such as Kubernetes, to manage how containers communicate with each other, with services, and with external networks.
- CNI defines how network interfaces should be created, configured, and deleted for containers.
- It provides a standardized approach, ensuring that any CNI-compliant plugin can integrate seamlessly with a container runtime.
Pod Creation:
- Kubernetes requests the container runtime to create a pod.
- The runtime calls the CNI plugin to configure the pod's network.
CNI Plugin Execution:
- The plugin allocates an IP address for the pod.
- It sets up network routes, rules, and interfaces.
Networking Established:
- The pod is now part of the cluster's network, with routing to other pods and services.
Pod Deletion:
- The CNI plugin removes the network configuration and releases the IP address.
-
Flannel:
- Implements a simple overlay network.
- Often used for Kubernetes cluster networking.
-
Calico:
- Supports advanced networking policies.
- Provides Layer 3 networking without overlays for better performance.
-
Weave Net:
- Provides a simple-to-use network for Kubernetes and Docker clusters.
-
Cilium:
- Uses eBPF for high-performance and secure networking.
-
Multus:
- Enables attaching multiple CNI plugins to a single container.
- The network model is implemented by the container runtime on each node. The most common container runtimes use Container Network Interface (CNI)
- Services are abstractions that expose a network service to other pods and services in the cluster.
- Service is a clusterwide, it exists accross all nodes in the cluster but whitin a namespace.
- it is not specific to a one node.
- Service has its own IP address
- When a pod tries to reach another pod it first reaches the service then routes to the pod.
- ClusterIP: Internal service discovery within the cluster.
- NodePort: Exposes a service on each node's IP address.
- LoadBalancer: Uses a cloud provider's API to provsion a load balancer to expose a service.
- Kubernetes uses DNS for service discovery.
- Ingress exposes HTTP and HTTPS routes from outside the cluster to
serviceswithin the cluster. Traffic routing is controlled by rules defined on the Ingress resource. - An Ingress may be configured to give Services externally-reachable URLs,
load balance traffic,terminate SSL / TLS, and offername-based virtual hosting. - You may need to deploy an Ingress controller such as
ingress-nginx. - The name of an Ingress object must be a valid DNS subdomain name.
- Ingress frequently uses
annotationsto configure some options depending on the Ingress controller, an example of which is therewrite-targetannotation. - If the ingressClassName is omitted, a default Ingress class should be defined.

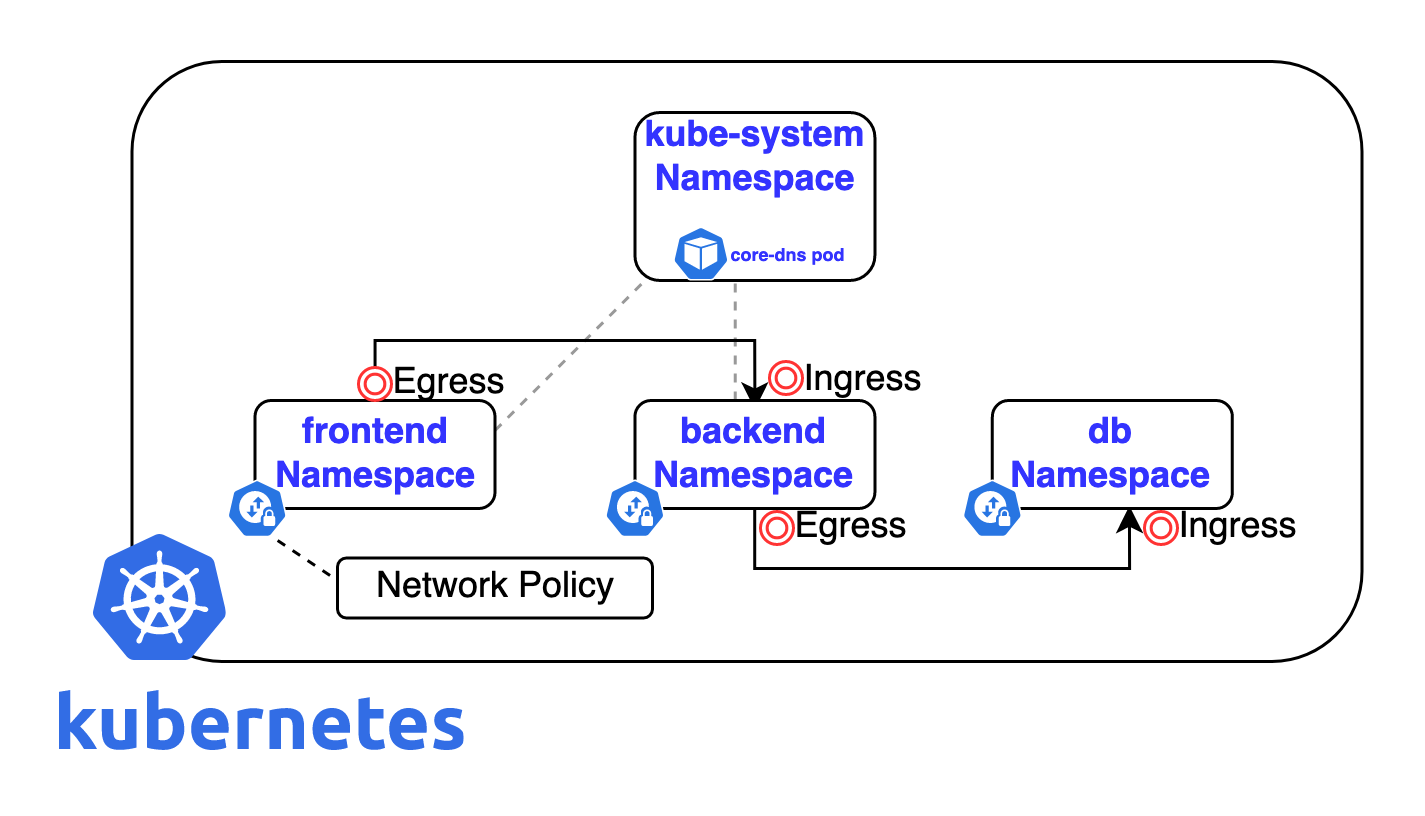
Path based Routing
apiVersion: networking.k8s.io/v1
kind: Ingress
metadata:
  name: minimal-ingress
  annotations:
    nginx.ingress.kubernetes.io/rewrite-target: /
spec:
  ingressClassName: nginx-example
  rules:
  - http:
      paths:
      - path: /testpath
        pathType: Prefix
        backend:
          service:
            name: test
            port:
              number: 80
apiVersion: networking.k8s.io/v1
kind: Ingress
metadata:
  name: ingress-wildcard-host
spec:
  rules:
  - host: "foo.bar.com"
    http:
      paths:
      - pathType: Prefix
        path: "/bar"
        backend:
          service:
            name: service1
            port:
              number: 80
  - host: "*.foo.com"
    http:
      paths:
      - pathType: Prefix
        path: "/foo"
        backend:
          service:
            name: service2
            port:
              number: 80
Host based Routing
apiVersion: networking.k8s.io/v1
kind: Ingress
metadata:
  name: ingress-wildcard-host
spec:
  rules:
  - host: "foo.bar.com"
    http:
      paths:
      - pathType: Prefix
        path: "/bar"
        backend:
          service:
            name: service1
            port:
              number: 80
  - host: "*.foo.com"
    http:
      paths:
      - pathType: Prefix
        path: "/foo"
        backend:
          service:
            name: service2
            port:
number: 80apiVersion: v1
kind: Secret
metadata:
name: testsecret-tls
namespace: default
data:
tls.crt: base64 encoded cert
tls.key: base64 encoded key
type: kubernetes.io/tlsapiVersion: networking.k8s.io/v1
kind: Ingress
metadata:
name: tls-example-ingress
spec:
tls:
- hosts:
- https-example.foo.com
secretName: testsecret-tls
rules:
- host: https-example.foo.com
http:
paths:
- path: /
pathType: Prefix
backend:
service:
name: service1
port:
number: 80Checks if the application is still alive inside the container.
If this probe fails → Kubernetes restarts the container.
Used when the app is stuck, deadlocked, or crashed.
Example:
“Is the app running at all?”
Checks if the application is ready to receive traffic.
If this probe fails → Kubernetes stops sending traffic to the pod
(but does NOT restart it).
Used during:
- startup
- heavy load
- temporary failure (DB down, cache warming, etc.)
Liveness = "Should I restart you?"
Readiness = "Should I send traffic to you?"
apiVersion: apps/v1
kind: Deployment
metadata:
  name: myapp
spec:
  replicas: 2
  selector:
    matchLabels:
      app: myapp
  template:
    metadata:
      labels:
        app: myapp
    spec:
      containers:
      - name: myapp
        image: myorg/myapp:1.0
        ports:
        - containerPort: 8080

        livenessProbe:
          httpGet:
            path: /health
            port: 8080
          initialDelaySeconds: 20
          periodSeconds: 10
          failureThreshold: 3

        readinessProbe:
          httpGet:
            path: /ready
            port: 8080
          initialDelaySeconds: 10
          periodSeconds: 5
          failureThreshold: 3