| College: | CUNY School of Professional Studies |
|---|---|
| Course-Name: | Software Application Programming I |
| Course-Code: | IS 210 |
| Lesson: | 01 |
| Points: | 20 |
| Available: | 2014-08-28T00:00:00-0400 |
| Due-Date: | 2014-09-02T09:00:00-0400 |
| Authors: | Chad Heuschober
Clayton Kramer |
This week's assignment serves to introduce you to the workflow you'll use to submit the majority of your homework in class. It should take somewhere between thirty-minutes and one-hour to complete, however, as this will be your first experience with many new tools and technologies, I highly recommend that you start work early in the event that you need to ask for assistance.
You should have completed all of the readings for this week before attempting this assignment. Additionally, you should have already installed Python 2.7 and Git on your machine. This assignment will require a stable internet connection as much of this work will interact with external resources.
Use of the term terminal can be ambiguous depending upon the operating
system in use. For users of Microsoft Windows operating systems, this
specifically refers to the git bash shell that is available after the
installation of Git. To use the git bash shell, right click the
contents of a folder in Windows explorer and select git bash. This
should bring up a compatible terminal window. Users of OSX or other Linux
distributions will find that that their default terminals already come equipped
with the correct tools after the installation of Git and Python 2.7.
For the purpose of this exercise, console commands will be preceded with a dollar sign ($), to indicate the presence of a shell. Do not include this symbol in any commands you type or copy yourself.
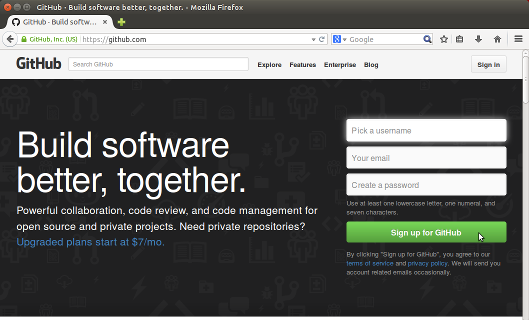
Create a GitHub account.
Visit the GitHub website.
If you do not already have an account, create one.
Enter a new username, your CUNY SPS-issued e-mail address, and a password, then click Sign-Up.
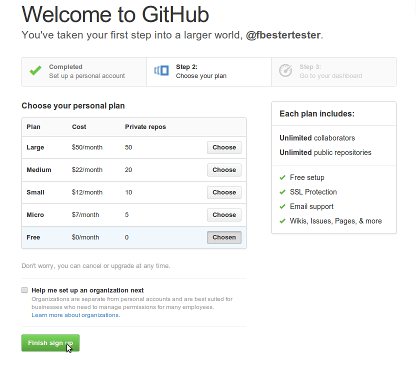
The next screen will ask if you wish to upgrade to a paid plain. A paid plan is not necessary for this course and will offer you no advantages or benefits to coursework. Unless you have a personal reason to choose otherwise, leave the Free tier selected and click Finish sign-up.
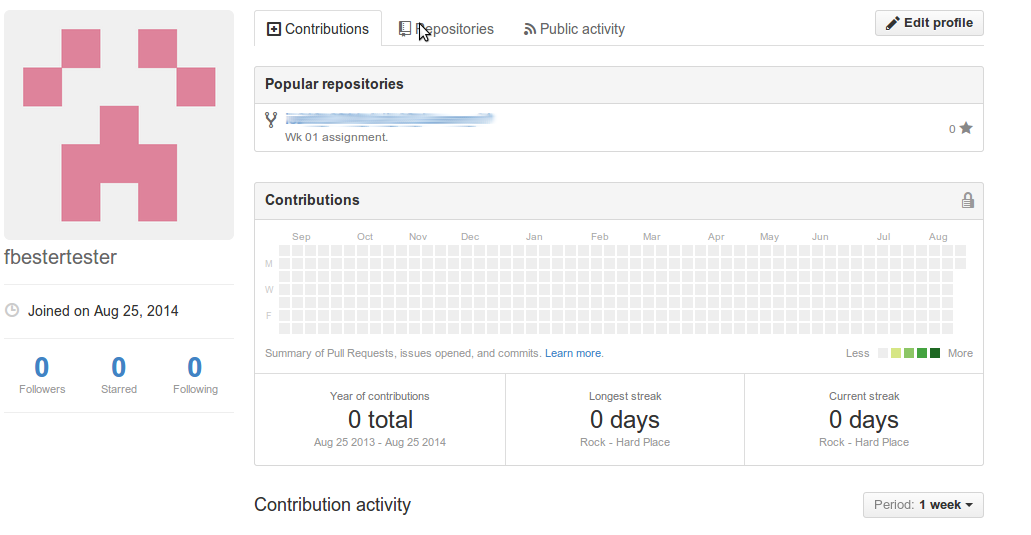
This will take you to your GitHub landing page. If you'd like to edit your profile further but including a picture or other details about yourself, you can visit your GitHub Profile page by clicking the little gear icon in the upper right corner of the header.
Check your e-mail address from a verification e-mail from GitHub.
If you didn't yet receive one, visit your GitHub E-Mail Settings page and request another e-mail verification.
If you already have a GitHub account, please make you you have added your official CUNY SPS e-mail address to the account.
- Visit your GitHub E-Mail Settings page and add your CUNY SPS e-mail address.
- Be sure to verify this address, checking your e-mail for a verification e-mail sent from GitHub or using the GitHub E-Mail Settings page to send another verification e-mail.
Post your GitHub username into the assignment body on BlackBoard.
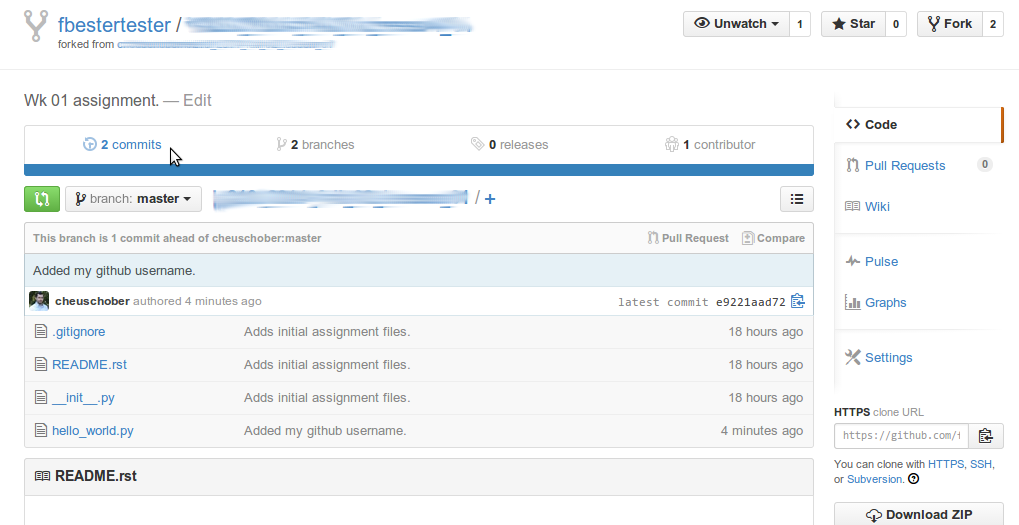
Visit the assignment repository page.
Use the Fork button in the upper-right hand corner of the screen to fork this repository, which, effectively, makes a copy of it on your personal GitHub account.
Double check that you are now on your own personal fork of the assignment repository and not the assignment repository page itself. You can differentiate the two because the title of the repository at the top of the screen should now start with your GitHub user account name, not the account name of your instructor.
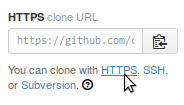
Now that you're on your personal fork of the assignment repository copy the HTTPS Clone Url in the lower right-hand corner of the screen.
Open a terminal on your local machine.
If this is your first time using Git on this machine, you must first set-up Git to recognize your contributions.
Type the following two commands:
$ git config user.name "FIRST LAST"
$ git config user.email "MY@EMAIL"
Replace
FIRSTandLASTwith your first name and last name as you would like them to appear on your contributions. ReplaceMY@EMAILwith the same e-mail address you registered with GitHub. This should be your CUNY SPS e-mail address.Once Git is properly configured, type the following into the terminal in order to take a copy of the repository.
$ git clone HTTPS_CLONE_URL lesson_01Replace HTTPS_CLONE_URL with the HTTPS Clone URL you copied from GitHub. This will copy your personal fork from GitHub to your local machine and into a directory called
lesson_01Next type:
$ cd lesson_01This command will
cdor change directory from the current one you're in to thelesson_01directory.To list all the files and folders in this directory, type:
$ lsWhich should return the following:
hello_world.py LICENSE README.rsthello_world.pyis a Python file.LICENSEis a standard license file. In this case, all of the code in this repository is covered under the Mozilla Public License (v2) which is an open-source license that permits you to distribute, share, and alter this code without fear of legal retribution provided that you follow the guidelines stated in the license file.README.rstis a README, a special type of documentation file about this project. The.rstextension indicates that it's written in reStructuredText, the official language of Python documentation. If you were to peer inside that file you would the directions you're reading right now. Each assignment's instructions will be distributed with the assignment source code.We'll start by running our first python program. Type the following at the command line:
$ python hello_world.pyThis will call the Python interpreter to start (
python), and feed it a file to read and execute (hello_world.py). It should have printed the following:Hello World!Now, open hello_world.py in your text editor.
If you don't already have a favorite text editor, you can open the file with
idlethe basic text editor that comes bundled with Python. To open the file withidle, just type:$ idle hello_world.pyYou should now see the contents of the file which look like:
#!/usr/bin/env python
# -*- coding: utf-8 -*-
"""Prints a ``Hello World`` statement."""


print "Hello World!"
Alter the file in such a way that instead of printing:
Hello World!Have it print:
Hello USERNAME!Where
USERNAMEis your GitHub username.Save your changes and exit the text editor
To see if you were successful, try running the code again:
$ python hello_world.pyIt should now print
Hello YOUR-GITHUB-USERNAME!.Once you're satisfied with the changes, let's take a look at what we've done in the repository. Type the
git statuscommand and receive output similar to the following:$ git status On branch master Your branch is up-to-date with 'origin/master'. Changes not staged for commit: (use "git add <file>..." to update what will be committed) (use "git checkout -- <file>..." to discard changes in working directory) modified: hello_world.py no changes added to commit (use "git add" and/or "git commit -a")
The
git statuscommand returns the status of your current repository. In this case it's telling us a few things:On branch master Your branch is up-to-date with 'origin/master'.
This sections tells us which working branch we're using. We're not going to use branches very often so you can skip this part, however the next line is interesting because it's told us that it knows this code is up-to-date with what you have in the your personal fork on GitHub. If you or someone else had made changes to the repository on GitHub after you had clone'ed the source, then this would report how far ahead your remote branch was. You could then choose to use a command like
git pullto pick up the most recent changes from GitHub. This is helpful if you spread your work across several machines.Changes not staged for commit: (use "git add <file>..." to update what will be committed) (use "git checkout -- <file>..." to discard changes in working directory) modified: hello_world.py no changes added to commit (use "git add" and/or "git commit -a")
This section is more relevant for us. The first section it lists are files that it knows exist but that you have not told it to save in the next revision. When you closed you text editor you saved the file itself but a repository revision can be thought of like a snapshot in time of a whole folder full of files. Right now, though you've changed the file inside you haven't saved or committed the changes.
Here it tells us that it knows that
hello_world.py, specifically, was modified and it reminds us of the command we need to execute to save it.Before we do that, however, there's one more git command that's useful for seeing changes. Let's say it's not enough that the file was changed. Let's say we want to know exactly what was changed from the last time the file was commited in the repository. Try the following command:
$ git diffYou should receive some pretty dense output that looks like:
diff --git a/hello_world.py b/hello_world.py
index dfd137d..2eb4936 100644
--- a/hello_world.py
+++ b/hello_world.py
@@ -3,4 +3,4 @@
 """Prints a ``Hello World`` statement."""


 -print "Hello World!"
 +print "Hello zoezebra!"
The above output is a machine-readable diff format. It's sometimes used to create patch files and has a long history in the computer industry. While it's not amazingly legible, with practice it is possible to understand the output. On the first few line it tells us what's being compared and at what line numbers the comparison is happening. Then it shows us the difference. The line prefixed with a dash (
-) is being removed and replaced with the line prefixed by a plus sign (+).I don't expect you'll use this every day but it can be helpful for checking your changes.
Now that we've reviewed our changes let's stage them for the commit. Type:
$ git add hello_world.pyThis will tell git to add
hello_world.pyin its next revision. This does not actually commit the change but it will be included.To check that it is staged, you can use
git statusagain which should produce output similar to the following:On branch master Your branch is up-to-date with 'origin/master'. Changes to be committed: (use "git reset HEAD <file>..." to unstage) modified: hello_world.py
Compared to our earlier
git statusthehello_world.pyfile has changed from being listed under Changes not staged for commit to being listed under Changes to be committed. We now are ready for our first commit.As I said earlier, a commit is like saving the folder at a particular point in time. With Git we can not only save the folder as of a specific commit but we can go back to earlier states or merge changes with future states. For now, we just want to save our change to
hello_world.py.Type the following:
$ git commit -m "Changed hello world to include my github username."Congratulations! You've taken a snapshot of your work! You should receive a few lines of output like:
[master dbe34f4] Changed hello world to include my github username.
1 file changed, 1 insertion(+), 1 deletion(-)
The first is your commit ID and the second is just a summary of the changes.
We include the
-m "..."portion to automatically include the portion between the double quotes as our commit message. A commit message is an important part of every commit as it should inform someone why you made the changes you made in this particular commit. While not intended to be books, they should be complete enough to glean an understanding of the intention behind the changes in the files. Since a very large commit with many file changes would have a large commit message, we generally encourage commits to be small and often each representing a single change in function or output. If you do not include the-m "..."portion then a window should pop-up allowing you to write your commit messages in an alternative text editor.Note
If you'd ever like to see the history of commits in a particular repository, use the
git logcommand.The work is now saved on your local machine, but is not yet be pushed to your repository on GitHub. To do that, type the following:
$ git push originThis will
pushthe contents of your current repository to the remoteoriginrepository (in this case, the one you cloned from: your personal fork of the original branch).Now it's time to go back to GitHub to see our changes.
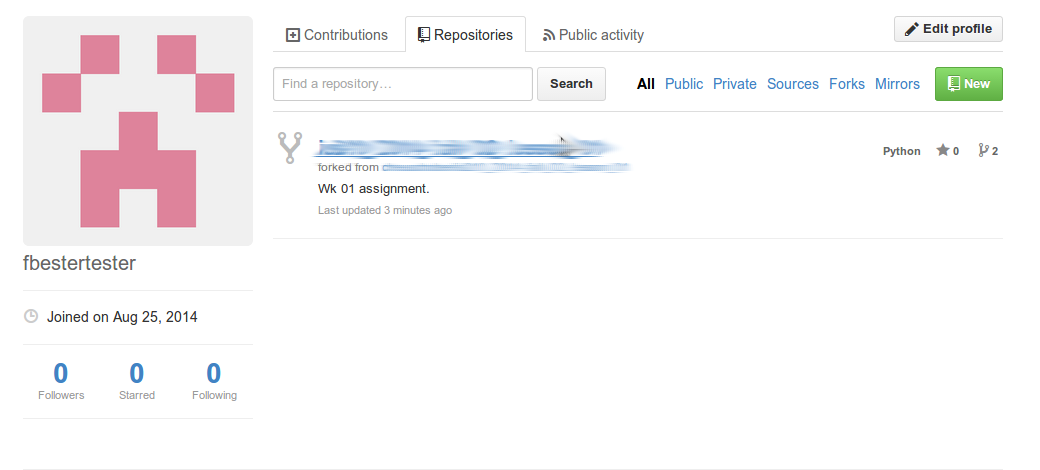
Click your username to be taking to your user landing page.
On the center, near the top, click the tab called Repositories
You should have been presented with a list of repositories including the one you were just working on: is210_2014_fall...
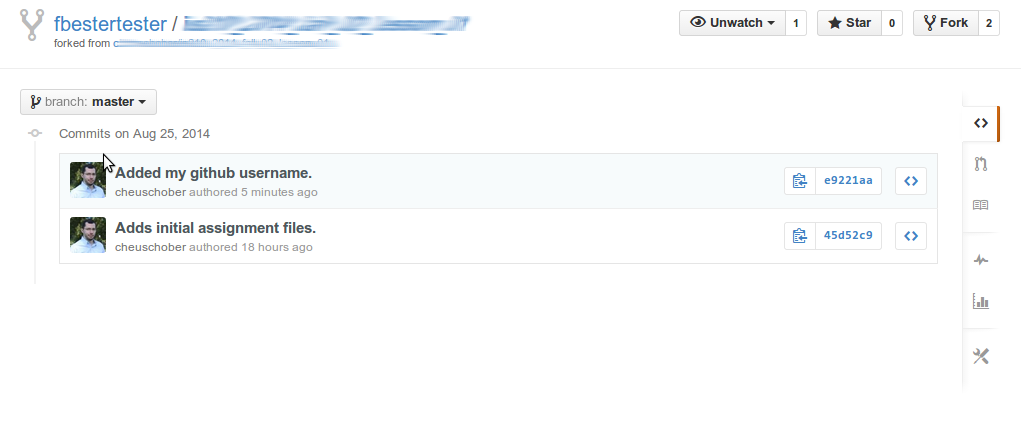
Click the repository link to see the repository and the changes you made. You can click individual files to see how they look now or use the commits tab above to see all of the commits (including your own).
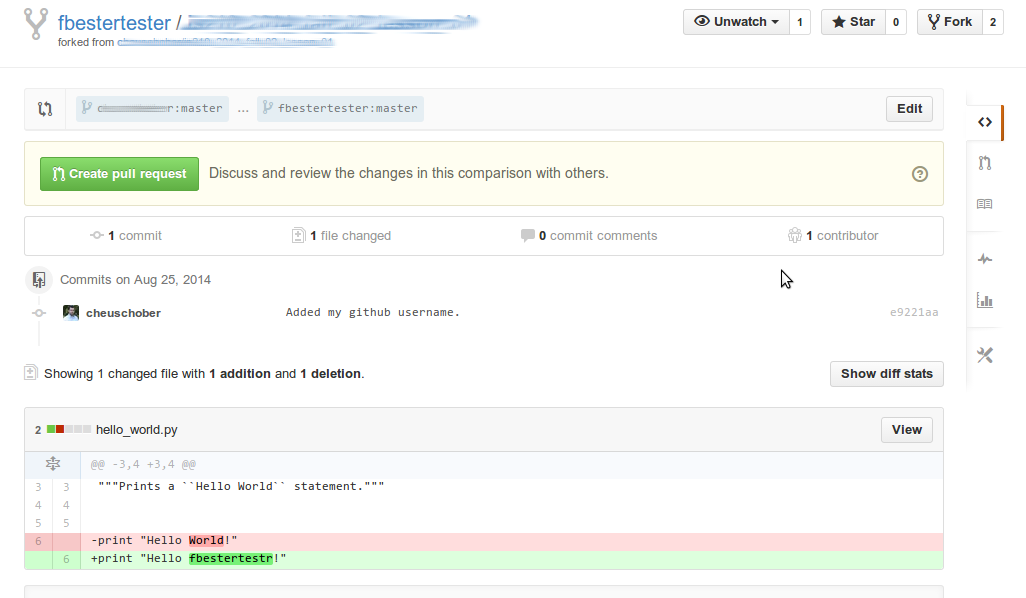
Once you've confirmed that you're happy with the changes, you must open a pull request in order submit changes for grading.
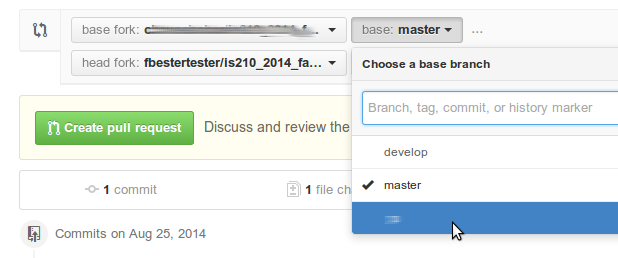
Go back to the main page for the Lesson 01 repository on GitHub and click the green icon with two arrows in a circle to the left of the branch dropdown. The tooltip for this icon is "Compare, review, create pull request" which is exactly what we're going to do.
The next page will outline the available changes for this pull request, there's only one thing we need to fix: right now it will send this pull request against the master branch and we don't want that. In the future, each student will have his or her own branches on the parent repository but, for now, we'll all use a different branch, the
pullbranch.Click the Edit button in the pull request header.
Select the
pullbranch from the Base: branch drop down.The base branch should now point to
pull
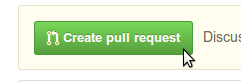
Now that you're pointing to the correct branch, it's time to pull the big green Create Pull Request button!
You'll be taken to a screen where you can add your first comment in a pull request. Think of this as your message to me, your instructor, for when you want me to look at something. The title defaults to that of the most recent commit and often that's O.K. but you also might want to include a description of why you made certain choices or questions you might have. Once you're done adding details about why you want to merge this code into my repository, click the big green Create Pull Request button in the righthand corner.
You will now be redirected to your pull request page. Congratulations, at this point you have officially submitted your first code for review. Copy the link to your pull request and paste it into the body of the assignment.


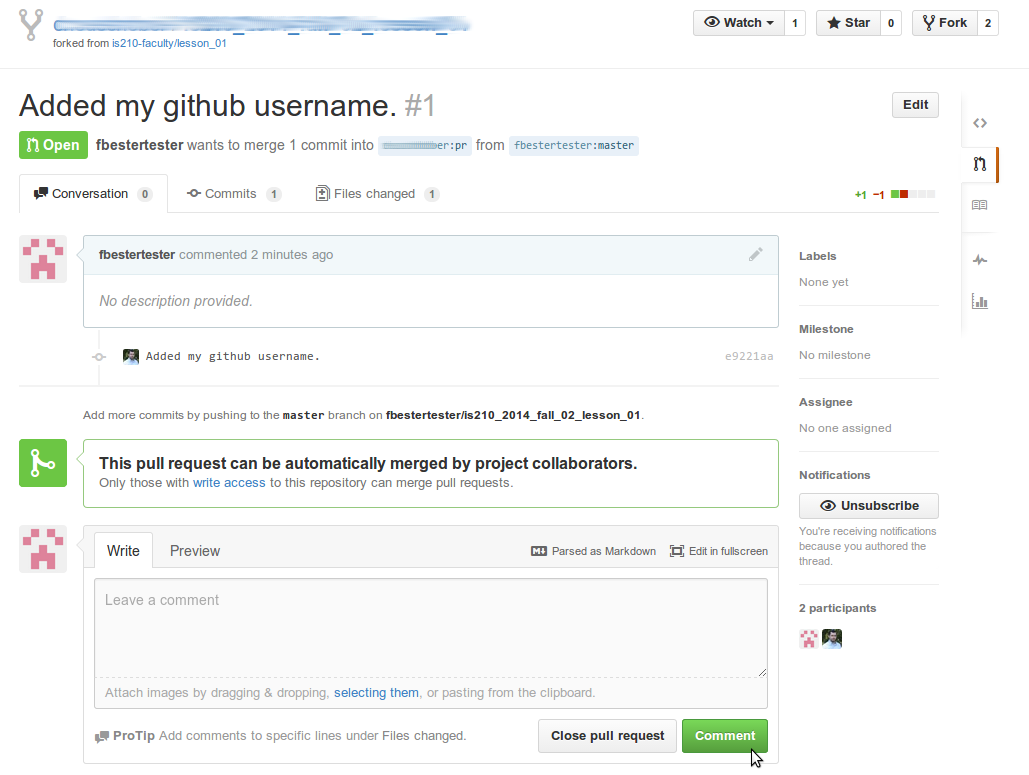
The next page you will see after submitting a pull request is the pull request comment page. This is where I can view your work and where we'll converse about your successes or questions such as they may arise. You can also use it to send additional comments to me with direct references to line numbers or test results. Please keep in mind that all GitHub communications are public.
Note
I have sometimes found it difficult to rediscover this page when I've submitted my own pull requests. It's important to remember that a pull request happens on the "origin" repository, in this case, your instructor's official assignment repository. To find this page again, you must first visit the assignment repository and then click the Pull Requests link in the right-hand navigation.
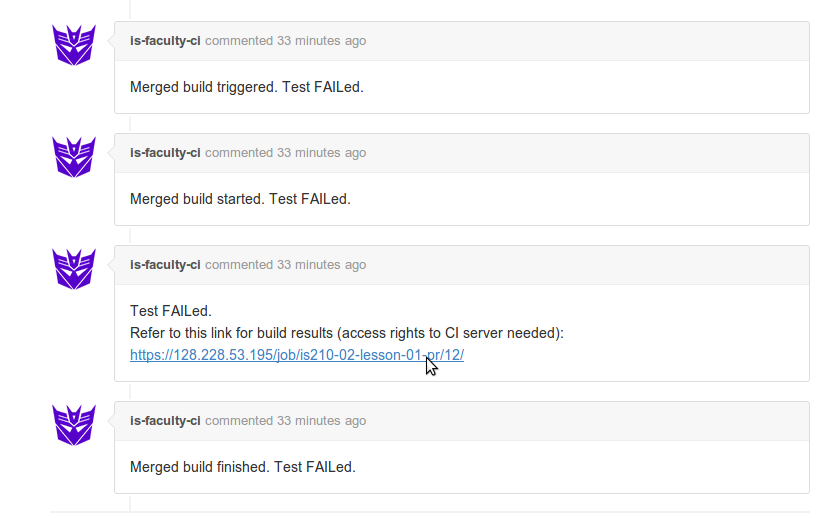
Within a few minutes of submitting your pull request, the IS-Faculty-CI robot will start automated testing. You should see its chatter in the comments of your pull request. The bot will notify you at 4 points in time:
- When a build has been triggered (think of this as queued, it doesn't mean the tests have started).
- When a build has actually started.
- When the test results have been analyzed.
- When the build has finished.
Our build robot is rather pessimistic so I wouldn't worry too much if it marks the first two steps as being FAILed since it hasn't analyzed the results quite yet.
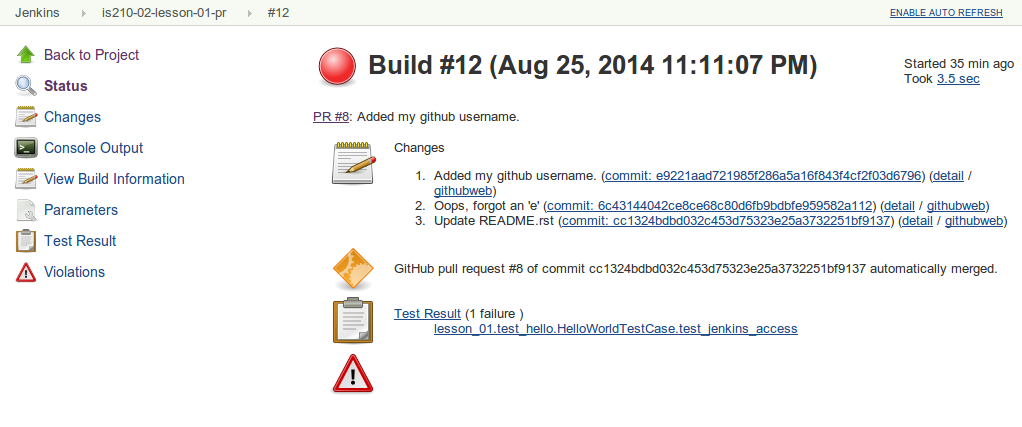
Once the test results are available, the bot will give you a link to more details on the build in one of the comments. For this exercise, please follow that link (it will begin with https://128.228.53.195/).
You've now reached Jenkins, the heart of our continuous integration platform that allows us to provide you with automated results. The page you have been taken to is one that shows the results that are directly related to the round of tests you kicked off with your pull request.
There are three links of interest here on the leftnav, two of which are necessary for the completion of the assignment. For this assignment we're going to ignore the Console link which provides detailed output from all of the testing.
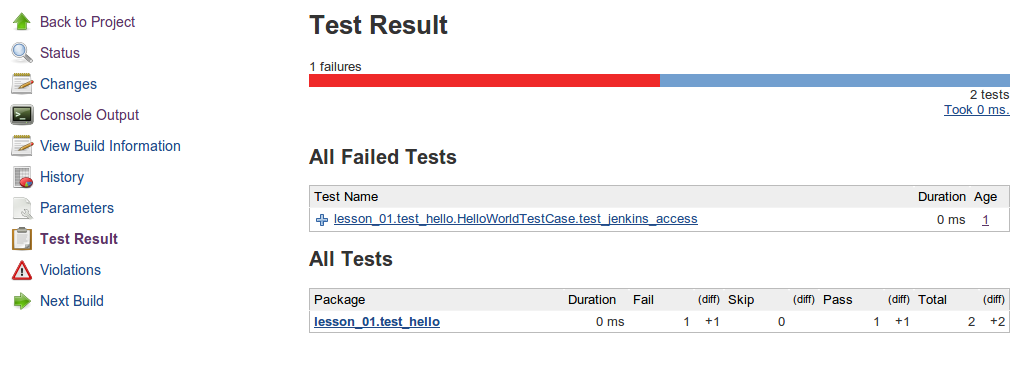
The first link of interest to us is the Test Result link which will take you to a page that summarizes your test results. If you followed the directions above, you should have just one failed test listed under All Failed Tests:
lesson_01.test_hello.HelloWorldTestCase.test_jenkins_accessIf you click the plus (+) sign beside its name you'll be given the Error Details that were reported. If you followed the directions thus far your error message should read:
Good Job! This test is EXPECTED to fail. Your code is: XXXXWhere
XXXXis a long string of characters.Copy and paste this code into your homework reply.
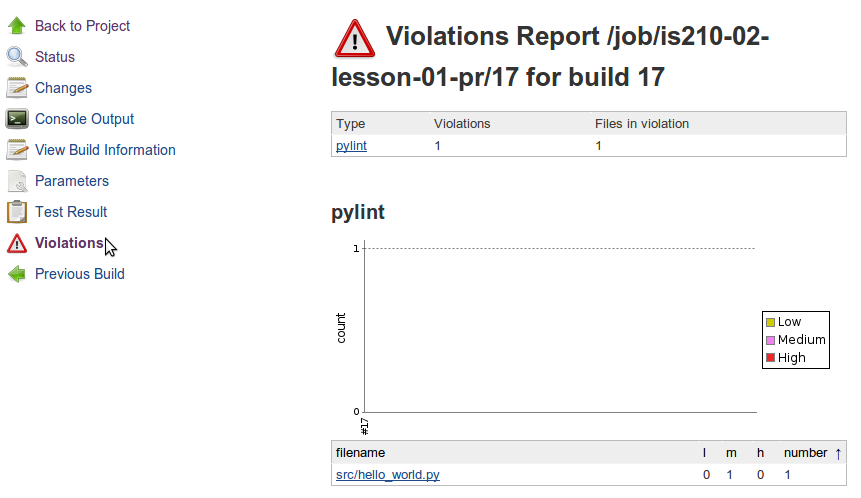
Now that you've seen the test results, we're going to take a look at another Jenkins feature, Violations. Click on the violations link on the left and you'll be brought to a page that shows coding and syntax violations.
Under the pylint heading is a list of files. If you followed directions exactly, at least one file should be present and reporting a violation. Click the filename to view the file with the offending line highlighted.
If you hover your mouse over the little violations icon, you'll be given the type of coding violation this file has incurred.
Now, for your final task, apply what you learned in the Concepts and Terms reading.
- Decipher the meaning of the violation and how to fix it.
- Use your local repository to make one more change to the offending file.
addandcommitthat file to your local repository.pushyour changes upstream to your personal GitHub fork
Note
A fun fact about GitHub is that you don't need to subit another pull request at this point. GitHub senses that you've made some more changes and automatically adds them to the original pull request which is still open. This, in turn, will trigger another round of automated tests.
Use this to get into the habbit of making incremental changes in response to test results. You only need to go through the trouble of forking a repository and submitting a pull request once; everything else can happen locally with git commands.
To summarize, you must complete the following tasks for full credit:
- Create a GitHub account and paste your GitHub account name into the body of the assignment.
- Fork the lesson repository, make changes, and submit a pull request. Paste the link to the pull request into the body of the assignment.
- View the test results from the Jenkins testing server. Copy the code hidden in a failed test result and paste it in the body of the assignment.
- View the coding violations in Jenkins for the initial pull request.
Identify the problem in the code using details given in the Concepts
and Terms guide. Make corrections locally,
add,commit, andpushthose changes to your upstream repository.